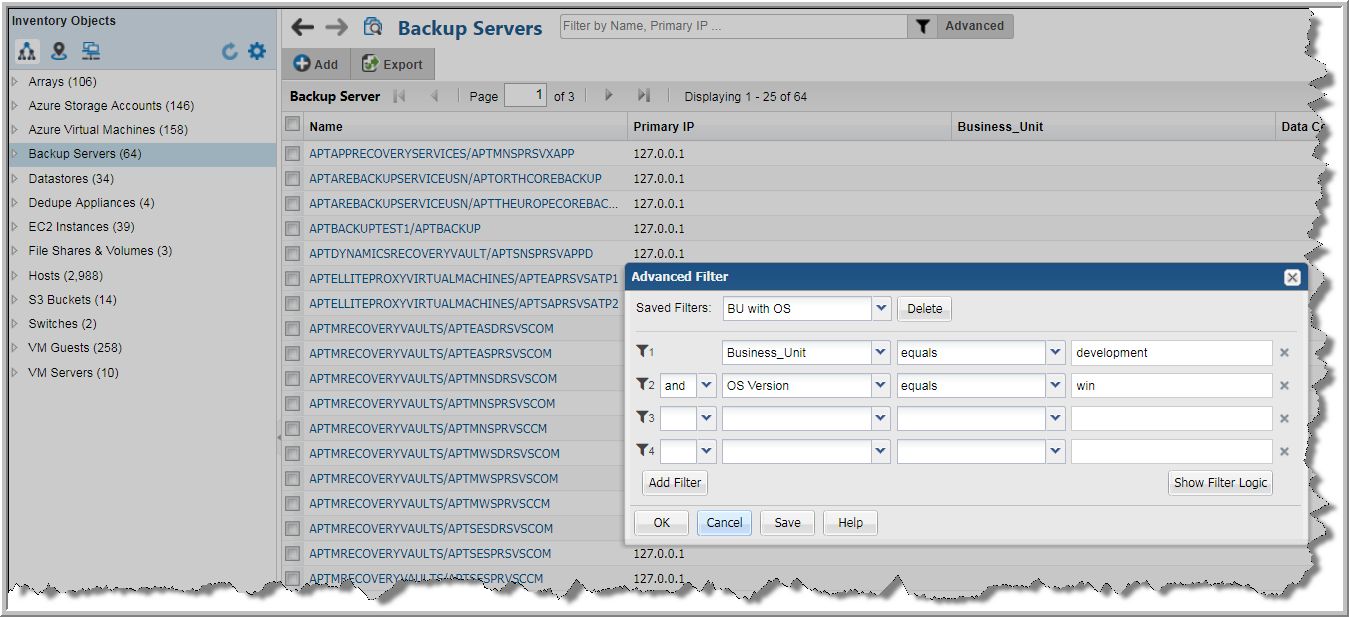
Advanced Filtering
Advanced Filtering is another, more granular level of discovery available on the management grids. This powerful option uses database fields as the criteria along with the use of logical operators to build custom queries. Not all fields are searchable. Those fields are not offered as a selection when building an Advanced Filter.
An option to customize the filter logic is also provided.
In the Inventory, advanced filters are tied to a specific Inventory Object Type. You must either select one in the Hierarchy panel prior to building an Advanced Filter, or if your Inventory is not organized by Object Type, you must specify one when constructing the query.
To build an Advanced Filter
1. Navigate to a grid that supports the Advanced Filter:
• Inventory list view
• Data Collection - Collection Status and Collector Administration
• Solutions - Storage Optimization and Risk Mitigation
• Users and User Groups
2. Click Advanced.
• If you are in the Inventory list view, choose an Inventory Object Type and then click Advanced.
3. Select a field name in the first drop down list.
5. Enter a value in the third drop down list.
6. Choose a logical operator, And/Or, if you are adding another set of filters to your query.
7. Click Add Filter to add up to 12 additional filters.
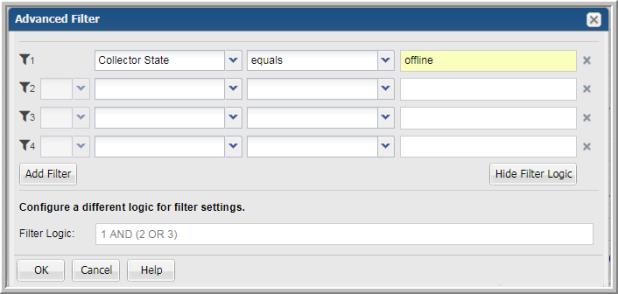
8. Click
Show Filter Logic to customize the filter logic if required. Logic defined in this field will override any setting established on the top of the dialog. See
Customizing Advanced Filter Logic.
Customizing Advanced Filter Logic
Customize filter expression order and the operators using the Filter Logic field. Logic defined in this field will override any setting established on the top of the dialog. Use the numbers on the left of the filter expressions to construct your Filter Logic.
1. Click
Show Filter Logic to expand the window. This action disables the operators you set, and the Filter Logic field becomes mandatory.
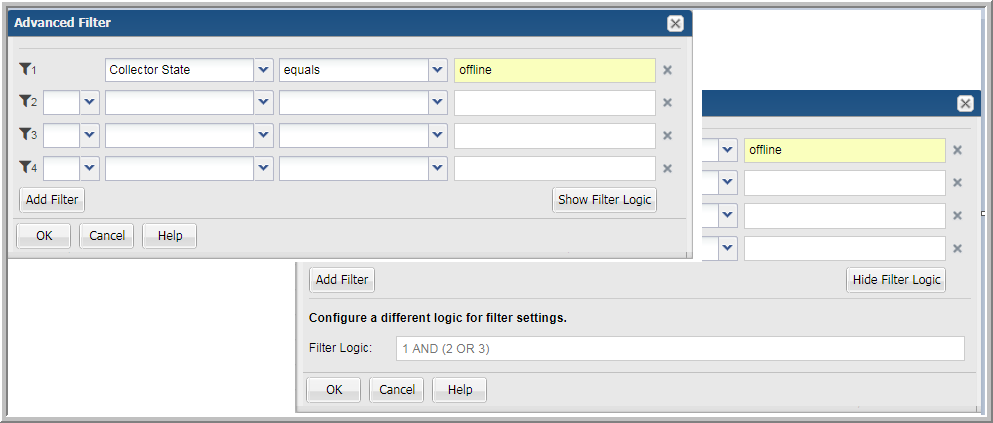
2. Edit the logic using the filter numbers and by adding parentheses or changing the operators. For example, you can change “1 AND 2 OR 3” to “1 AND (2 OR 3)”.
Saving Advanced Filters (Inventory)
In the Inventory, filters are tied to a specific Inventory Object Type. You can save Advanced Filters and access them by selecting the associated object in the Hierarchy panel. For example, if you create a Saved Filter for Hosts, you must select Hosts in the Inventory hierarchy to access the filter again.
1. Click the Inventory tab.
2. Click Advanced. Choose an Inventory Object Type if the field is displayed.
3. Select a field name in the first drop down list.
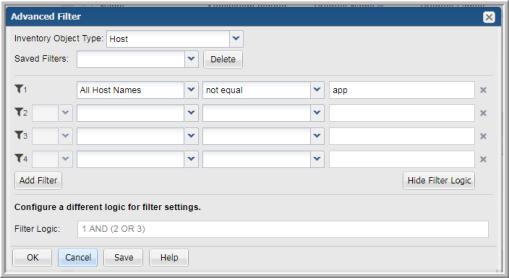
5. Enter a value in the third field.
6. Choose a logical operator, And/Or, if you are adding additional criteria.
7. Click Add Filter to add up to 12 additional filters.
8. Click
Save. The
Create Saved Filter dialog is displayed.
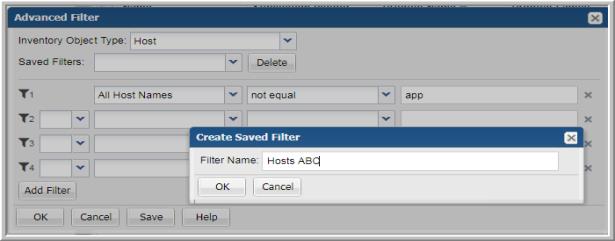
9. Enter a name and click OK.
This Saved Filter becomes available for selection in the Advanced Filtering dialog for this Inventory Object Type.
Advanced Filtering Examples
Example 1
Let’s say you want to find all NetBackup Master Servers to edit a property or assign an attribute.
2. Select Backup Servers in the Hierarchy Panel.
3. Click
Advanced.
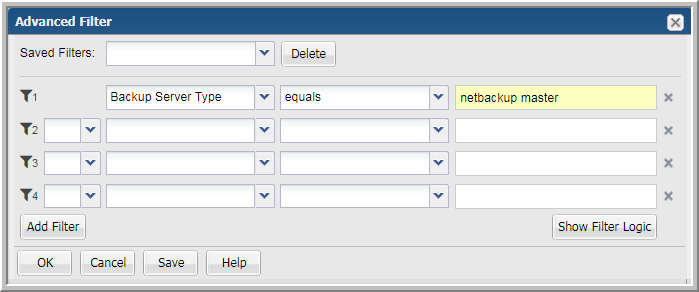
4. Select Backup Server Type.
5. Set the operator to equals and enter NetBackup Master.
If you want to see the Backup Server Type Name column in your grid display, you must explicitly add it. See
Selecting Columns on Management Pages.
Example 2
Let’s say you want to find all hosts on a LINUX platform that were created after July 20, 2017.
2. Select Hosts in the Hierarchy panel.
3. Click
Advanced and the selections should be:

If you want to see the OS Version and Creation Date as columns in your grid display, you must explicitly add them. See
Selecting Columns on Management Pages.
Example 3
Advanced Filtering is useful for discovering what’s been left out of a criteria set. For example, find backup servers that have not been assigned to a Business Unit. Note, Business Unit would be an attribute you must assign to an Inventory Object.
1. Choose the Default Hierarchy (object, subsystem) in the Inventory.
2. Select Backup Servers in the Hierarchy panel.
3. Click
Advanced and the selection should be:
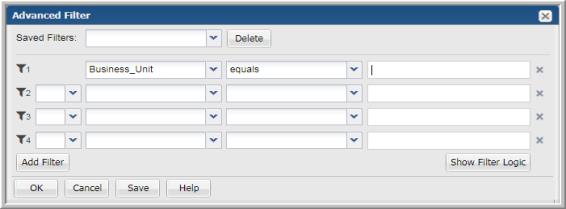
You set the value as blank, but you must select an operator. In the example, the operator is equals.
If you want to see the Business Unit as a column in your grid display, you must explicitly add it. See
Selecting Columns on Management Pages.
Example 4
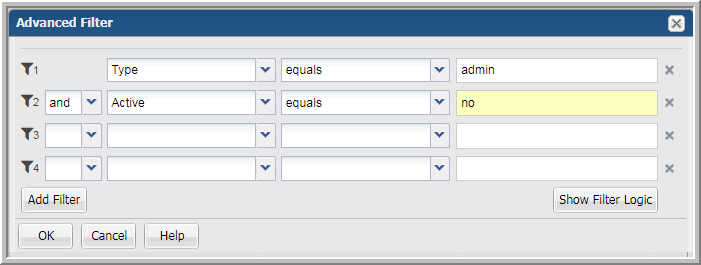
Let’s find all the users who are assigned as an Admin but are no longer active.
1. Navigate to Admin>Users>Users and Privileges.
2. Click
Advanced and the selection should be:
Advanced Filter Operators
Select from the following operators:
Operator | Description |
equals | The result value is equal to the value entered. The entry can be a number, date, string or a blank. The match is case insensitive. Date entry format is based on your locale and the settings in your profile. To set the value as a blank, you must select an operator. |
not equal | The result value is not equal to the value entered. The entry can be a number, date, string or a blank. The match is case insensitive. Date entry format is based on your locale and the settings in your profile. To set the value as a blank, you must select an operator. |
greater than | The result value is greater than the value entered. The entry can be a number, date, string or a blank. The match is case insensitive. Date entry format is based on your locale and the settings in your profile. To set the value as a blank, you must select an operator. |
less than | The result value is less than the value entered. The entry can be a number, date, string or a blank. The match is case insensitive. Date entry format is based on your locale and the settings in your profile. To set the value as a blank, you must select an operator. |
greater than or equal to | The result value is greater than or equal to the value entered. The entry can be a number, date, string or a blank. The match is case insensitive. Date entry format is based on your locale and the settings in your profile. To set the value as a blank, you must select an operator. |
less than or equal to | The result value is smaller than or equal to the value entered. The entry can be a number, date, string or a blank. The match is case insensitive. Date entry format is based on your locale and the settings in your profile. To set the value as a blank, you must select an operator. |
contains | The value of the entry is present anywhere in the value of the result. Example: If the entry is “rattle” and the value entered is “rat” or “at” will be displayed. The entry can be a number, date, string or a blank. The match is case insensitive. Date entry format is based on your locale and the settings in your profile. To set the value as a blank, you must select an operator. |
does not contain | The value entered is not present anywhere in the value of the result. The entry can be a number, date, string or a blank. The match is case insensitive. Date entry format is based on your locale and the settings in your profile. To set the value as a blank, you must select an operator. |
is a member of | The result value is equal to any of the comma-separated values entered. This string of values is the equivalent to a multi-select. There is no limit to the number of characters that can be entered for this value. The entry can be numbers and strings. To set the value as a blank, you must select an operator. |
is not a member of | The result value is not equal to any of the comma-separated values entered. This string of values is the equivalent to a multi-select. There is no limit to the number of characters that can be entered for this value. The entry can be numbers and strings. To set the value as a blank, you must select an operator. |
matches regular expression | The result value matches the regular expression entered. The entry can only be a string. See also:
http://docs.oracle.com/javase/7/docs/api/java/util/regex/Pattern.htmlFor example: To find all hosts that start with qa_, use ^qa_.* |
does not match regular expression | The result value does not match the regular expression entered. The entry can only be a string. See also:
http://docs.oracle.com/javase/7/docs/api/java/util/regex/Pattern.html |
Clearing Advanced Filters
The
Filter by page-level operation enables you to create a custom view on a management grid. You can quickly determine if your view has filters applied, and clear it if required. A message and a link to clear the filter is displayed beside the
Filter by field.
1. Click the Clear Filter link to remove all filter criteria and reset the view.
Deleting Saved Advanced Filters
1. Navigate to the Inventory.
2. Choose the Default Hierarchy.
3. Select the object type for which the Advanced Filter was created.
4. Click Advanced.
5. Select the
Saved Filter from the drop down list.
6. Click Delete.