Managing Hosts and Backup Servers
The Inventory enables you to quickly assess the status of your system’s virtual and physical hosts by evaluating collected or imported details of all hosts from across your organization. It does not include discovered, but not collected from hosts.
The Inventory List view enables you to manage individual Hosts and groups of Hosts. You must be in the Inventory List view to perform management operations. Note, all operations are privilege based. The following management operations are only available for Hosts and Backup Servers:
The following operations are available for all objects, including hosts:
Adding and Editing Hosts and Backup Servers
Navigate to the
Inventory and organize your hierarchy to display Hosts or Backup Servers. See
Using the Hierarchy Toolbar to Organize Your Data. As a part of creation, you must assign Hosts/Backup Servers to a Host Group. After adding hosts or backup servers, the
Refresh icon will display a badge to indicate the database has been updated with new objects. Click
Refresh to display the additions in their appropriate categories in the Inventory view.
To add a host/backup server
1. Toggle to the List view with Hosts or Backup Servers displayed. The Hierarchy panel can be arranged in any configuration, but you must select Hosts/Backup Servers, to add a Host or Backup Server.
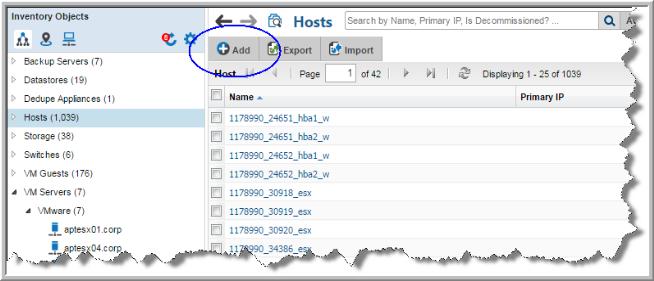
2. Click
Add.
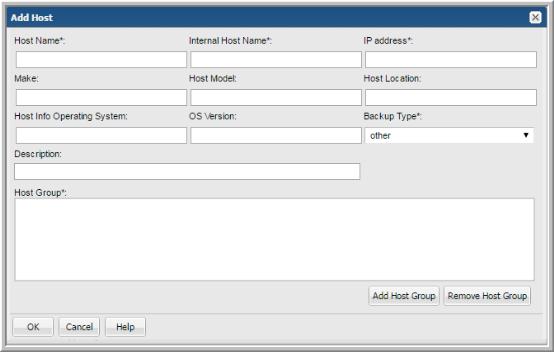
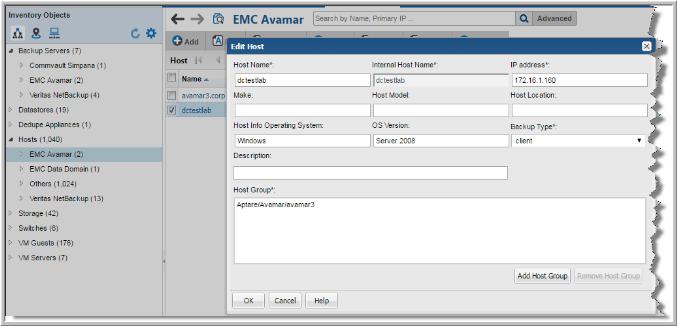
3. Specify the required information.
• The Host Name is the name that will be displayed in reports. This is a required field.
• The Internal Host Name must be an exact match for the name of the host as it is recognized by the product from which it was collected. This is a required field.
• IP address of the host. This is a required field.
• The Make, Host Model, Host Location, Host Info Operating System, and OS Version, if known.
• The Backup Type that you select from the drop-down list should characterize a specific host. Typically, this backup type is required when configuring a data collection policy. If the host is not a Backup server, select Other. This is a required field.
To edit host details
Navigate to the
Inventory and organize your hierarchy to display Hosts. See
Using the Hierarchy Toolbar to Organize Your Data. As a part of editing, you can assign and remove hosts from Host Groups. See
Editing Host Group Membership.
1. Toggle to the List view with Hosts displayed. The Hierarchy panel can be arranged in any configuration, but you must select Hosts/Backup Server to add a Host or Backup Server.
2. Select Hosts or a host group. The individual Hosts are displayed in the view pane.
3. Select the Host to edit. The
Edit button is displayed once you select the host.
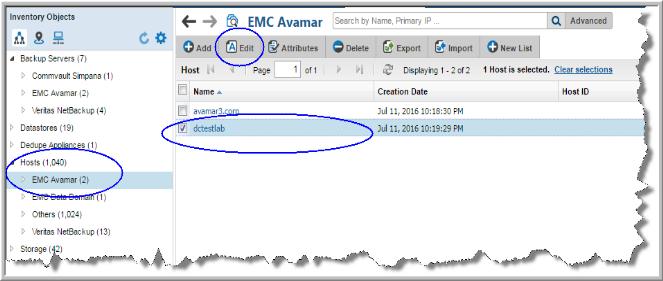
4. Click
Edit.
5. Edit the details as required.
• The Host Name is the name that will be displayed in reports. This is a required field.
• The Internal Host Name must be an exact match for the name of the host as it is recognized by the product from which it was collected. This is a required field.
• IP address of the host. This is a required field.
• The Make, Host Model, Host Location, Host Info Operating System, and OS Version, if known.
• The Backup Type that you select from the drop-down list should characterize a specific host. Typically, this backup type is required when configuring a data collection policy. If the host is not a Backup server, select Other. This is a required field.
Importing Hosts
If your hosts are not part of a data collection process, you can still manually add them using the Import function. Import adds the data to the Portal database and displays the information in the Inventory. If a host already exists in your system, Import will update the host’s details.
Before importing, create a comma-separated values (CSV) file of host data using the
CSV Format Specifications.
CSV Format Specifications
Create a comma-separated file that contains the following fields for a host, in the order listed in the following table. Note that each field in the CSV must have an entry, even if it is a null entry within the commas. Field values cannot contain embedded commas.
Name | Type | Value |
/path_to_host_group | String | The path to the host group must be the full path from the root host group. The host group corresponds to your StorageConsole domain. Null values are not allowed. Note: If you are using StorageConsole in a multi-tenancy environment, you may not know the full path to the root host group. For security purposes, if there are multiple domains and host groups, you will only know the path within your host group. Only an administrator with a Super User role can provide the full path. |
internal_name | String | The host name, typically how it is known in your data center, is a required field with a maximum of 128 characters. Null values are not allowed. |
external_name | String | The host name, as you want it displayed in the Inventory, is a required field with a maximum of 128 characters. Null values are not allowed. |
description | String | The host description, as it will be displayed in the Inventory, has a maximum of 256 characters. |
location | String | Location of the host, a maximum of 64 characters. |
ip_address | String | Host IP address, a maximum of 40 characters. |
make | String | Make of the host, a maximum of 64 characters. Example: Dell PowerEdge |
model | String | Model of the host, a maximum of 64 characters. Example: 4300 |
os_version | String | Operating system version of the host, a maximum of 128 characters. Example: RHEL 2.1 |
os_platform | String | Operating system platform of the host, a maximum of 128 characters. Example: Linux |
EXAMPLE: hostImport.csv
/HDS/Finance Assets,Finance NBU Master,Finance Backup,Main backup server for the finance group,HQ New York,10.10.10.10,Dell,64-bit, 10.0.10240,Microsoft Windows
Import Notes
• If the host already exists in the specified host group, the details are updated.
To import hosts from a CSV file
2. Select Inventory.
3. Navigate to Hosts and select a host group. This can be anywhere in the hierarchy structure that displays hosts.
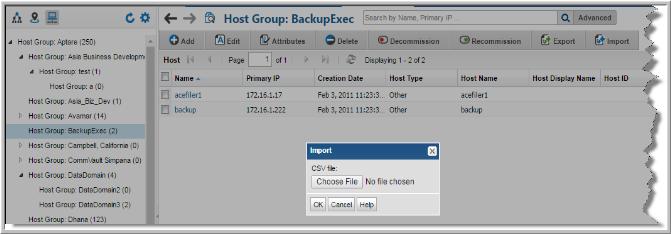
4. Click Import.
5. Click Choose File to navigate to the CSV to import.
6. Click OK. You must refresh to see the new hosts in the grid.
Decommission/Recommission Hosts and Backup Servers
Note: Prior to APTARE StorageConsole 10, the procedure for decommissioning a backup master server directed you to change its host type to client. This previous method is no longer supported and, in fact, may result in data reporting issues. Use the procedure described in this section to decommission a host, a master server, or any other server.
Under the following circumstances, you will need to decommission a host or master server from the StorageConsole database, while still retaining its collected historical information for auditing purposes.
• Any Host: Frequently, large organizations decommission hosts and re-use the host IP addresses and/or host names. In this case, the host must be flagged in the StorageConsole database so that historical data remains, but the newly collected host with the same IP address and/or host name can be included in data collection and reporting.
• Backup Servers: When you decommission a backup master server from your enterprise, you must let the Portal know that it is no longer available for data collection. In StorageConsole, after decommissioning a backup server, the active policy clients that are no longer being backed up will not count against your backup license count.
When you decommission a host or server, StorageConsole takes the following actions, to ensure that historical data remains intact:
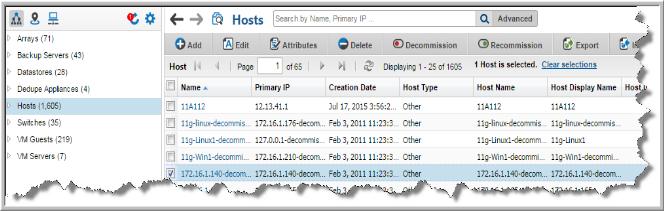
• Renames the host in the database, according to the following format: <host name>-decommissioned-<date>
• Logs the decommissioning actions, including the user and date, in a database audit table.
Note: Post decommissioning, when data collection encounters the re-purposed IP address or host name, a new host is created in the database.
When you recommission a host, StorageConsole takes the following actions:
• Renames the host to its original name, discarding the labels that were appended when the host was decommissioned.
• Logs the recommissioning actions, including the user and date, in a database audit table.
Note: Recommissioning a host may not be successful, as data collection may have collected another host that has been brought online with the same name or IP address.
To decommission a host or a backup server
1. Select
Inventory.
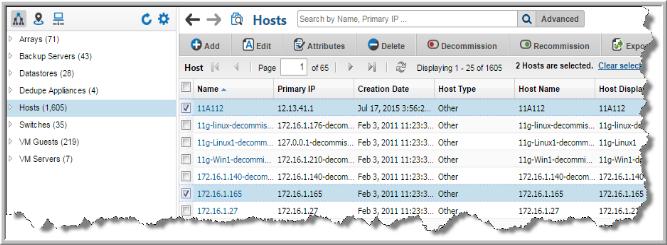
3. Select the items to manage. You can select all the items on a page by clicking the checkbox on the top of the management page. Note, only all the items displayed on a single page are selected.
4. Click Decommission. Two confirmation dialogs are displayed.
5. Enter your password. This is the same password with which you logged into StorageConsole. This is an audited process.
When you decommission a host or server, StorageConsole takes the following actions, to ensure that historical data remains intact:
• Renames the host in the database, according to the following format: <host name>-decommissioned-<date>
• Logs the decommissioning actions, including the user and date, in a database audit table.
Note: When data collection encounters the re-purposed IP address or host name, a new host is created in the database.
To recommission a host or a backup server
1. Select
Inventory.
3. Select the items to manage. You can select all the items on a page by clicking the checkbox on the top of the management page. Note, only all the items displayed on a single page are selected.
4. Click Recommission. Two confirmation dialogs are displayed.
5. Enter your password. This is the same password with which you logged into StorageConsole. This is an audited process. When you recommission a host, StorageConsole takes the following actions:
• Renames the host to its original name, discarding the labels that were appended when the host was decommissioned.
• Logs the recommissioning actions, including the user and date, in a database audit table.
Note: Recommissioning a host may not be successful, as data collection may have collected another host that has been brought online with the same name or IP address.
Deleting Hosts
You may want to delete hosts from the reporting database for the following reasons:
• You do not want the hosts to appear in your reports.
• The host is inactive and should no longer be backed up.
Warning: If you choose to Delete a Host, you are irretrievably deleting hosts from host groups and the reporting database. All related host historical data will also be permanently deleted from the database and unavailable in all reports. A pop-up window warns you of this action to prevent inadvertent deletions. This is an audited action and requires a password before deletion can proceed.
Note: When you delete a host, it removes everything related to the host except the VM Server. To remove the related VM Server, you just explicitly delete it in the Inventory. This prevents servers from being orphaned in the database.
In most cases, you should
remove a host from a group, thereby
un-linking it from its relationship with other hosts in that group. Also, you can easily
move or
add a host to other groups. See also,
Decommission/Recommission Hosts and Backup Servers.