Importing Hosts from a CSV File
If your hosts are not part of a data collection process, you can still manually add them using the Import function. Import adds the data to the Portal database and displays the information on the Host Management page. If the hosts already exist in your system, Import will update the details.
Before importing, create a comma-separated values (CSV) file of host data.
NOTE: The Import function is not supported in a split architecture (the database resides on a different server than the portal).
CSV Format Specifications
The CSV file must contain the following minimum fields using this order:
1. /path_to_host_group
NOTE: The path to the host group must be the full path from the root host group. The host group corresponds to your domain. If you are using StorageConsole in a managed service provider setup, you will not know the full path to the root host group. For security purposes, if there are multiple domains and host groups set up, you will only know the path within your host group. Only an administrator with a Super User role can provide the full path.
2. internal_name - maximum 128 characters, null is not accepted
3. external_name - maximum 128 characters, null is not accepted
4. description - maximum 256 characters
5. location - maximum 64 characters
6. ip_address - maximum 40 characters
7. make - maximum 64 characters
8. model - maximum 64 characters
9. os_version - maximum 128 characters
10. os_platform - maximum 128 characters
Import Notes
• If the host already exists in the specified host group, the details are updated.
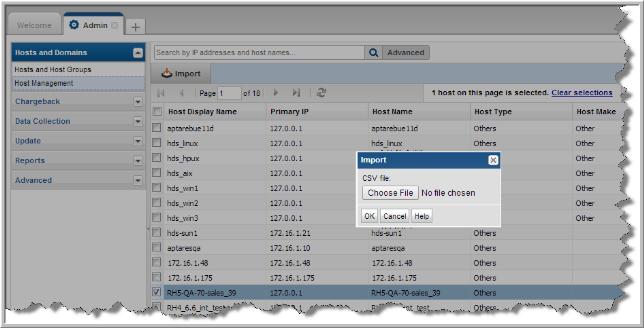
To import the CSV file
2. Select Admin > Hosts and Domains > Host Management.
3. Click Import.
4. Click Choose File to navigate to the CSV to import.

