Managing Attributes
You can add any number of attributes, and they can represent any characteristic. Ensure that you provide a descriptive name for the attribute and for the attribute values so that all users understand the intent of the attribute. The Inventory view uses attributes as a way for you to organize your view.
To manage attributes
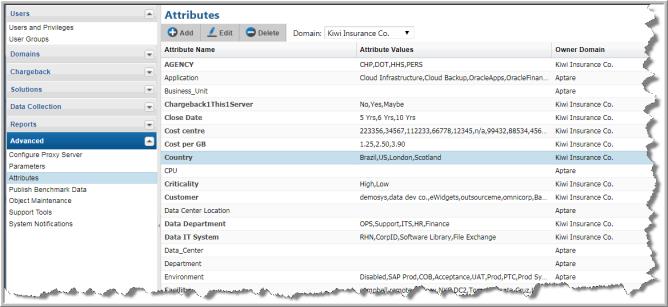
1. Select Admin > Advanced > Attributes.
3. In the Attribute Management page, several functions are available, depending on the domain ownership: Add, Edit, Delete.
Setting Attributes on Hosts
To further define a report’s scope and search criteria, you can define custom attributes with discrete values. Attributes are characteristics of your hosts. You can add any number of attributes, and they can represent any characteristic. These attributes provide an additional method for including and excluding data in a report.
Attributes provide a way of defining a set of objects that share a certain characteristic. Attributes represent logical relationships between objects and their relevant characteristics. Typically, you’ll set up attributes to aid in defining the scope of a report. For example, you might set up a “maintenance contract” attribute that you can associate with the hosts for which you have service coverage. Or, you might create an attribute to organize hosts by geographical location so that the administrators responsible for the hosts at each corporate location can generate reports for their specific sites.
You can select hosts in bulk and assign or modify attributes associated with them. Use Search and Advanced Filters to create a results set with the hosts you’d like to modify. For example, you can create a search query to find all Windows 2008 R2 systems as reported by NetBackup. When the search results are displayed, you can quickly apply a custom attribute such as patch applied.
Adding Attributes
When you add an attribute, a validation process ensures that the attribute does not exist in the domain’s single hierarchy path. Duplicate attribute names are allowed only in sibling domain hierarchies. See
Attribute Inheritance.
To add attributes
1. Select
Admin >
Advanced >
Attributes.
2. From the drop‑down list, select the domain to which you want to add the attribute. Your domain is displayed by default. Typically, only one domain is available and this domain selection is required only for multi-tenancy environments, such as Managed Services Partners (MSPs). When you add or delete attributes, you do so globally for your domain and all child domains. See also
Attribute Inheritance Overrides.
3. Click
Add. The
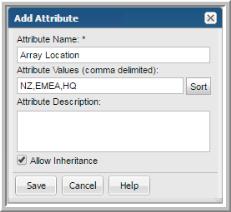
Add Attribute dialog is displayed.

5. Enter a comma-separated list of values for the Attribute. Values must be unique and are case-insensitive. The order in which you enter the values, is the order they are listed for selection in the Portal.
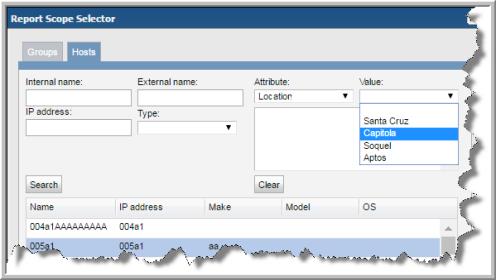
For example, if you enter the values Santa Cruz, Capitola, Soquel and Aptos for the Location attribute, that is how they are listed for selection when you assign them in the Report Scope. This unsorted order is determined when you create the values. The following screen shot shows an example of the unsorted values.
You can choose to have the values sorted. By sorting, the values will be displayed alphabetically in the Portal.

6. Click Sort to alphabetically sort the values when displayed in the Portal. Attributes and values are displayed in:
7. Enter an optional description. The description will be displayed in the Dynamic Template Designer when you are creating report templates.
8. Uncheck the Allow Inheritance if you do not want child domains to inherit this attribute’s values. The Allow Inheritance checkbox is checked by default to set a flag that enables child domains to inherit the attribute’s values.
When inheritance is disabled, users in sub-domains will be able to see the attribute, but they will not be able to see values in the
Inventory or in a report scope. However, an administrator at the sub-domain or parent level can override the values of the attribute, making the attribute’s values available to the sub-domain. See
Override Inherited Attribute Values.
9. Click OK in the Add Attributes dialog. The new attribute is displayed.
Editing or Renaming Attributes
To edit attributes
Not all attribute details can be modified. For example, System Attribute details cannot be modified, but the list of values (LOV) assigned to them can be changed. The Domain can also restrict who can modify attributes. Attributes that can be fully modified are displayed in the Portal in bold.
If the user-defined attribute was created within your Domain, the attribute name, values, and description can all be modified. Most environments have only a single Domain. However, for multi-tenancy environments, where a hierarchy of Domains is used to partition data, you are
not permitted to modify attribute names in child Domains. You can modify the inheritance flag and the list of values of an attribute that was inherited from a parent. See also,
Attribute Naming Rules and
Attribute Inheritance.
Note that when you modify the name, a validation check is made to ensure that the name you enter does not conflict with an existing attribute in your Domain hierarchy.
1. Select Admin > Advanced > Attributes.
2. (Multi-tenancy/multi-domain environments) From the drop‑down list, select the Domain in which the attribute resides.
3. Select the attribute. Bold attribute names indicate that the attribute can be fully edited.
4. Click
Edit.

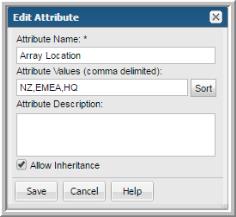
5. Modify the name and/or description.
6. Modify the Attribute Values. These must be comma-separated and unique. They are case-insensitive. The order in which you enter the values, is the order they are listed for selection in the portal.
• For example, if you enter the values Santa Cruz, Capitola, Soquel and Aptos for the Location attribute, that is how they are listed for selection when you assign them in the Report Scope. This natural order is determined when you create the values. You can choose to have the values alphabetically sorted.
7. Click Sort to alphabetically sort the values when displayed in the Portal. Attributes and values are displayed in:
Note: For
System Attributes, only the list of values and the
Allow Inheritance flag can be modified. For attributes inherited from a parent, you can modify
only the list of values and the inheritance flag. You are
not permitted to modify
attribute names in child Domains. See
Attribute Inheritance.
8. In the Edit Attribute dialog, click Save.
Deleting Attributes
Note: When you delete an attribute, it will continue to be available as a column in the Inventory view. Refresh the Inventory to access the most up-to-date list of attributes.
To delete attributes
1. Select Admin > Advanced > Attributes.
2. (Multi-tenancy/multi-domain environments) From the drop‑down list, select the Domain from which you want to remove the attribute.
3. Select the attribute. Click Delete.
• If the attribute is in use by a Dynamic Template, you will be prompted to confirm that you really want to delete the attribute. If you choose to delete an attribute that is in use, the template will no longer work as designed.
• Attributes inherited from a parent can only be deleted by an administrator of the Domain where the attribute was created.


