Managing Host Groups
Hosts can be assigned to more than one group. When creating host groups, you start from the host or backup server and assign a group or you can start from the group and assign members.
For approaches to host group organization and a list of typical host group management tasks, see
Planning Your Host Group Hierarchy and
Default Host Group Hierarchy for Veritas NetBackup.
Adding Host Groups and Sub‑Groups
Host groups can contain zero or more hosts/backup servers and zero or more sub‑groups. However, a host or backup server must always belong to a host group. As described in
Planning Your Host Group Hierarchy, you can create your host groups and sub‑groups based on physical and logical relationships. For example a physical grouping could be location. Logical sub-groups under location could be HQ, East Coast, West Coast and Europe.
You can add Host Groups from the Host Group view and/or during the host/backup server creation process. See
Adding and Editing Hosts and Backup Servers.
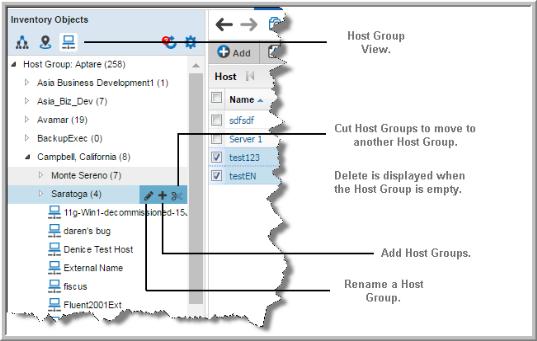
About Host Group Operations
In the Inventory, Host Group operations are available inline while in the Host Group view of the hierarchy panel.
Delete is only available when the Host Group is empty. You can also roll over a Host Group to view the Group ID. See
Finding the Host Group ID.
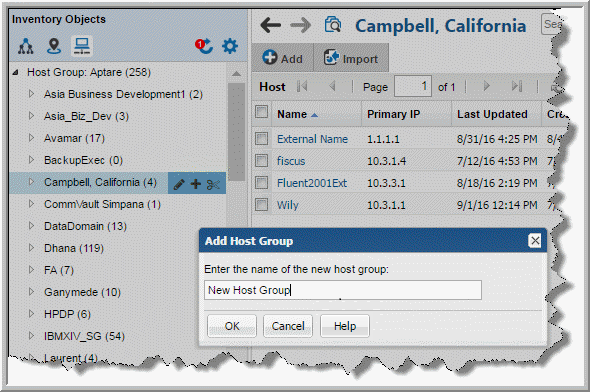
Adding Host Groups
Once the Host Group is created, membership is assigned through Host management operations.
To add a host group
1. Click Inventory.
3. Choose a host group folder.
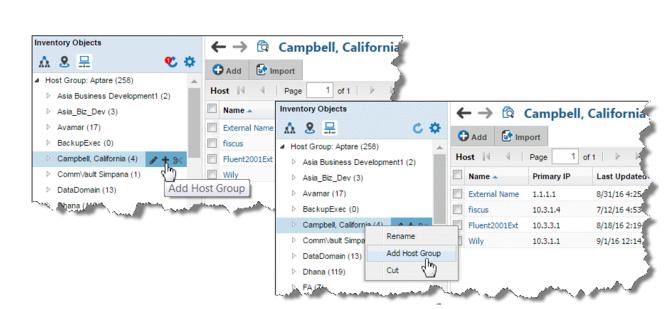
4. Click the
Add Host Group icon. These icons are displayed inline beside the host group.You can also
right-click. The Add Host Group dialog is displayed.
5. Enter a name for the new Host Group. Within the folder structure, the name must be unique. Folders on the same level cannot have the same name. The full path must be unique.
Note: The host group you selected in the hierarchy panel will be the parent of the host group you are about to add.
6. Click OK.
You can also add Host Groups during the host/backup server creation process. See
Adding and Editing Hosts and Backup Servers.
Automated Tool to Create Host Groups
If you have a large number of hosts/backup servers, you can use the provided PL/SQL utilities for bulk processing. Instead of manually creating and organizing host groups through the Portal, you can run PL/SQL utilities to do the work for you. For more information about batch processing, search the documentation for Bulk Load Utilities.
Host Group Membership
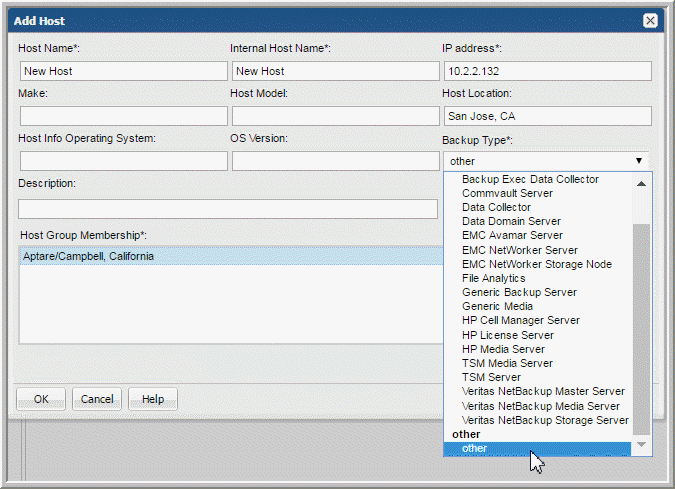
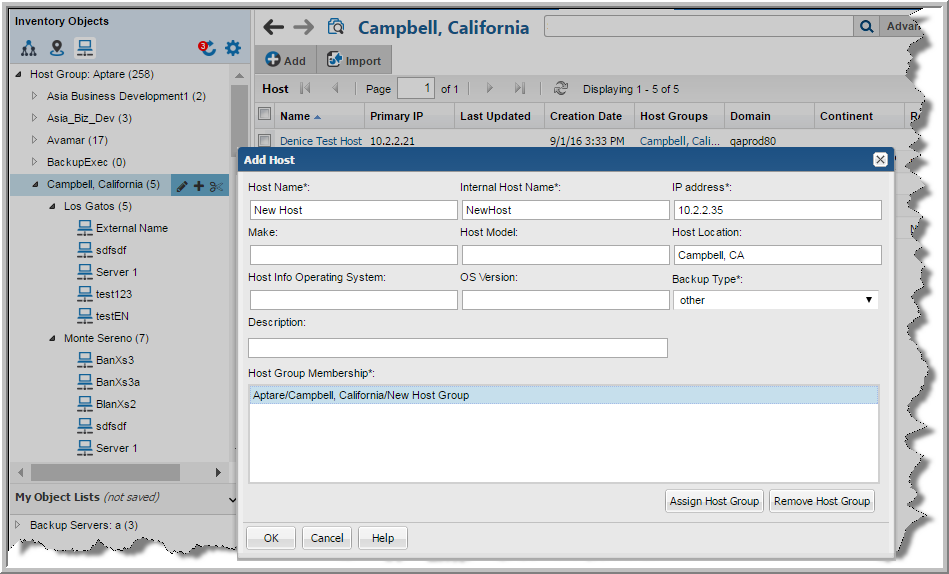
You can assign hosts and backup servers to host groups from any view in the Inventory that displays the objects. A Host Group has no limit to the number of hosts it can contain. When you add a host you must assign a Host Group. After adding a host, you can edit Host Group membership.
To assign a new host/server to a Host Group
You can add Host Groups from the Host Group view and/or during the host/backup server creation process. See
Adding and Editing Hosts and Backup Servers.
1. Click Inventory.
3. Choose a host group.
5. Click
Add to add a host to the selected host group. The
Add Host dialog is displayed
.
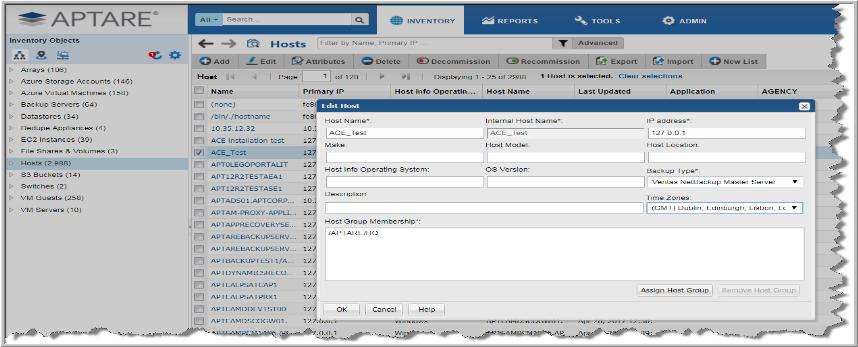
6. Specify the required information.
• The Host Name is the name that will be displayed in reports. This is a required field.
• The Internal Host Name must be an exact match for the name of the host as it is recognized by the product from which it was collected. This is a required field.
• IP address of the host. This is a required field.
• The Make, Host Model, Host Location, Host Info Operating System, and OS Version, if known.
The Backup Type that you select from the drop-down list should characterize a specific host. If the host is not a backup server or backup client, select Other. This is a required field. The Time Zones field is displayed when the server is designated as a Master Server. The Time Zone setting is only available only for a host that is configured as a NetBackup Master.
• Description - Enter a description relevant for your environment.
7. Click OK. The host is assigned to the Host Group you selected and the hierarchy panel is updated.
To copy a host/server into a Host Group
A host/server can belong to multiple Host Groups. When you copy a host/server from one Host Group to another, this retains the existing Host Group membership and adds the new membership.
1. In the Inventory, use the Hierarchy Toolbar and switch to Host Group view.
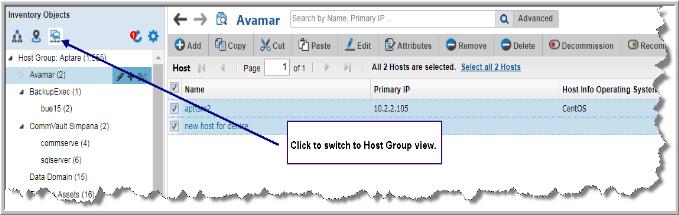
3. Alternatively, select the Host Group to edit in the Hierarchy Panel. The members of the group are displayed in the grid.
4. Select the Hosts or Backup Servers you want to copy into/assign to a new Host Group.
5. Click Copy.
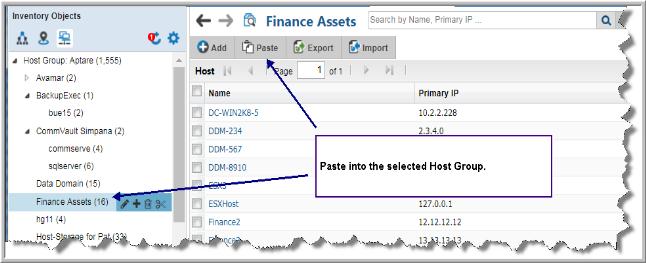
6. Select a Host Group in the Hierarchy Panel and click
Paste. The hosts/backup servers you selected are added to the selected Host Group.

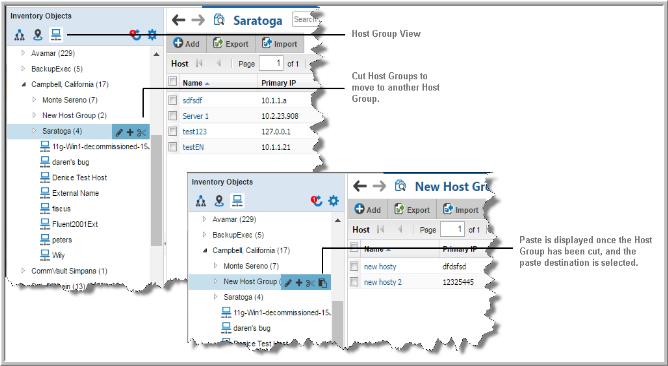
To move a host/server from a Host Group into another Host Group
Use Cut and Paste to move hosts/servers from one Host Group to another. This removes the existing Host Group membership and adds the new membership. Note, a host or backup server must always be assigned to at least one Host Group.
1. In the Inventory, use the Hierarchy Toolbar and switch to Host Group view.

3. Alternatively, select the Host Group to edit in the Hierarchy Panel. The members of the group are displayed in the grid.
4. Select the Hosts or Backup Servers you want to copy into/assign to a new Host Group.
5. Click Cut.
6. Select a Host Group in the Hierarchy Panel and click
Paste. The hosts/backup servers you selected are added to the Host Group and removed from the original Host Group.
To remove members from a host group
1. In the Inventory, use the Hierarchy Toolbar and switch to Host Group view.

2. Select the Host Group to edit in the Hierarchy Panel.
3. Select the Hosts or Backup Servers you want to Remove from a Host Group. The action bar displays available operations.
4. Click Remove. Remove unsubscribes the host/backup server from membership to the group. It does not delete the Host/Server or the Host Group. Hosts and backup servers must belong to at least one host group.
Renaming Host Groups
1. Click Inventory
3. Choose a host group folder. Inline icons are displayed for Host Group operations.
4. Click the rename icon. The
Rename Host Group dialog is displayed.
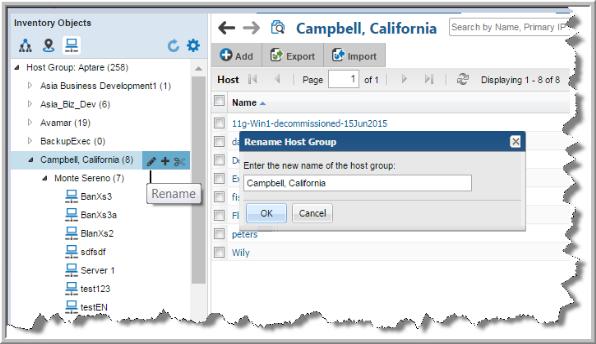
5. Enter the new name for the Host Group.
6. Click OK.
Deleting Host Groups
You must delete or move individual hosts into another host group before you can delete a Host Group.
To delete a host group
1. Click Inventory.
4. Delete the contents of each sub-group first. If there are sub-groups, you must delete the hosts from those groups first and then delete the group. Hosts can be deleted in bulk or individually.
Note: Hosts and backup servers must belong to at least one host group.

Moving Host Groups
If you need to reorganize your host groups, you can move them to preserve the sub-group structures.
To move a host group
1. Navigate to the Inventory.
4. Select the Host Group to move.
5. Click the
Cut icon inline.
6. Select the destination group. The Paste icon is displayed inline.
7. Click Paste.
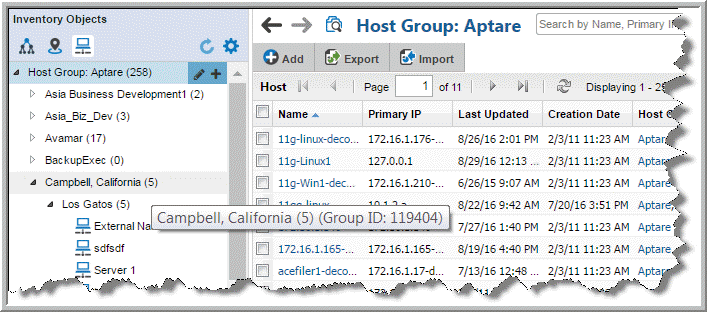
Finding the Host Group ID
When using the bulk load utility to add hosts to the IT Analytics database, the utility requires the Host Group ID as a parameter to determine which host group to populate.
To identify the unique identifier associated with a host group, take the following steps in the Portal.
1. Navigate to the Inventory.
2. Click the
Host Groups icon to switch the Inventory view.
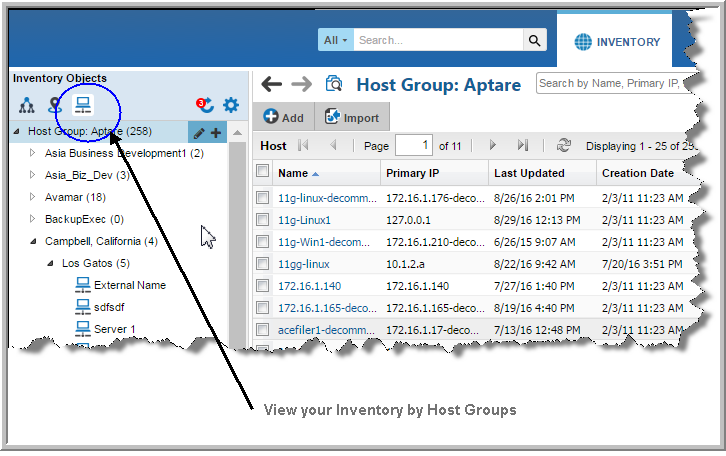
3. Verify the Host Group column is displayed on the grid, and optionally, use Advanced Filtering to locate the Host Group.
Note: The Host Group column, displayed in the Inventory for the Host Group management view, has sorting disabled to improve portal performance.
4. Hover your mouse over the Host Group folder in which your hosts reside. The Group ID will display in a tooltip.
Assigning a User Home Host Group
When you assign a user to a host group, the user can only gain visibility to those hosts at their assigned level and
below. This assigned level is called a
home host group. The user will not see any host groups above their defined home group.
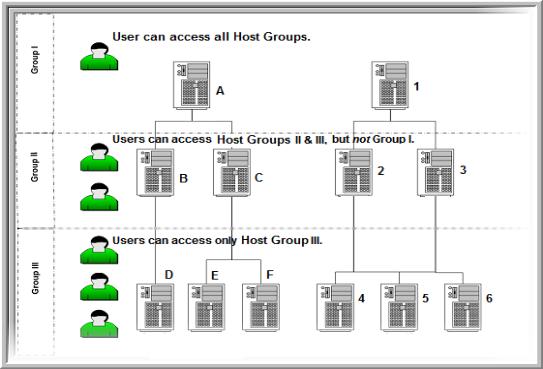
To assign a user to a host group
1. Choose
Admin >
Users >
Users and Privileges. The window displays all Portal users.
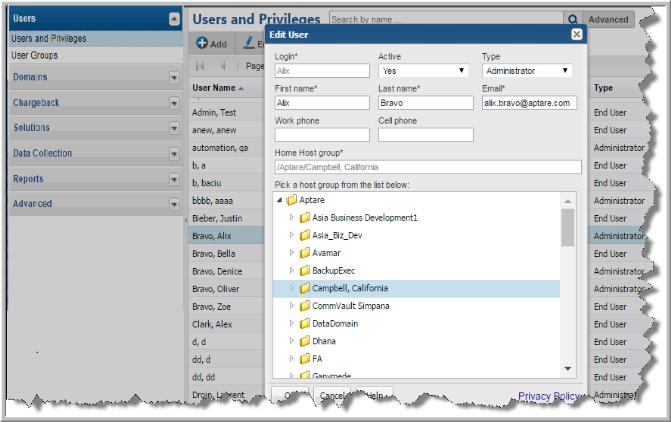
2. Select the user name to which you want to assign a host group, and click Edit. The window displays the user’s profile.
3. In the home group list, select the host group to which you want the user to belong and click OK.
Managing Backup Servers
In IT Analytics, backup servers are classified as a host. Although they are displayed as separate object in the Inventory, they are classified as special type of host. This means, all host report and management actions are valid for backup servers.
NetBackup Master Servers
NetBackup Master Servers have special considerations for setup and use.
Configure the Time Zone for a NetBackup Master Server
Whenever the Time Zone is modified, the system marks the Data Collector so that the updates are pushed to the Data Collector server. If the time zone is not explicitly configured for a NetBackup Master Server, IT Analytics defaults to the time zone of the Data Collector server.
Note that in IT Analytics reports, the date and time displayed for a backup transaction represents the date and time when the event actually happened.
Note: Currently, the Time Zone setting is available only for a host that is configured as a NetBackup Master Server.
2. Select the specific server, when located, to edit the details.
3. Click
Edit. The
Edit Host dialog is displayed. The fields displayed are dynamic and Time Zones are displayed when the
Backup Type, Master Server is selected.
Default Host Group Hierarchy for Veritas NetBackup
During the initial installation, the Data Collector searches for all backup servers and clients, and assigns them to their respective default host groups. The result is a default hierarchy that consists of the following host groups:
• Master Servers. If a client is being backed up by a backup server (or master server), the Data Collector assigns the client to this host group. This group organizes clients under host groups based on the backup server name.
• Clients Not In Policy. If a client does not have a backup policy, the Data Collector assigns the client to this host group. This applicable to Veritas NetBackup only.
• Inactive Policy Clients. After the initial installation, the Data Collector may create this host group for clients that have inactive policies. For more information, see
Identifying Inactive Clients (For Veritas NetBackup).
This applicable to Veritas NetBackup only. About the Master Servers Group
The Master Servers group represents the physical pool of backup servers. As you create additional host groups, you’ll add backup servers/clients from this Master Servers group into your new logical groups. This Master Servers group is created automatically and updated each day.
Note: APTARE recommends that you do not create new host groups within this default master group, as it is a system-maintained group, populated by Data Collectors. It is a best practice to retain this master pool of servers. To set up logical groupings for reports, create additional host groups outside of this default group and add clients from the Master Servers group.
Identifying Inactive Clients (For Veritas NetBackup)
Note: Beginning with Release Version 10.1, the host groups mentioned in this section are no longer automatically created. For legacy systems, if these host groups are no longer desired, a
serverGroupCleanup utility can be used to re-locate the clients and then delete the system-generated group. See
Move Hosts and Remove Host Groups.
There are two types of inactive clients, and in both cases these clients are not being backed up, maybe intentionally or unintentionally:
• Clients Not in Policy are not part of a policy at the time that a new Data Collector was added. Often these clients are resolved at the time of installation.
• Inactive Policy Clients were once part of a policy, but are not anymore.
To identify inactive clients
1. Navigate to Inventory.
2. Activate the Host Group view.
3. Select the Veritas NetBackup host group.
4. Select the
Clients Not in Policy host group. If you notice that there are clients in this host group, either assign them to a policy—if they should be backed up—or delete them. In some cases, you might determine that a client need not be backed up and should be removed. In this case, go to
Deleting Hosts.
5. Select the
Inactive Policy Clients host group. If you notice that there are many clients in the
Inactive Policy Clients host group and all these clients are supposed to be backed up by the same backup server, you probably accidently disabled the policy and need to enable it. In some cases, you might determine that a client does not need to be backed up, and should be removed. In this case, go to
Deleting Hosts.
6. Give the Data Collector time to refresh its list of clients. Every night the Data Collector queries your backup servers for a list of clients and assigns clients to their appropriate host groups.