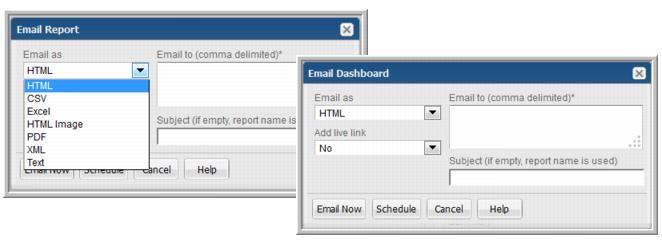
Email as | • HTML (.html). Use this format if you want to export this data as a web page. • CSV(.csv). Use this format to export tabular data to a spreadsheet or a database application such as Microsoft Access. • Excel (.xls). Similar to the CSV export, this file supports MS Excel-specific features. • HTML Image. A single image of the report. • PDF (.pdf). This read-only file lends itself to distribution and printing. • XML (.xml). Accesses the web page components. Note: XML is not available as an export type for dashboards. • Text (.txt). Produces a basic text file of the report. A text file of the report/dashboard. This selection provides the option to set a delimiter and use quotes in the emailed file. |
Email to | Provide a comma-separated list of email addresses. Verify all email addresses are valid. |
Subject | Specify an email subject if you want to override the report title. |
Add live link | You can add a link to the report within the Portal. After logging in, a user can view the report in the Portal. In environments where SSL is enabled, a configuration change is required to ensure that this link is secure. See the System Administrator’s Guide for details on modifying the portal.properties file. |

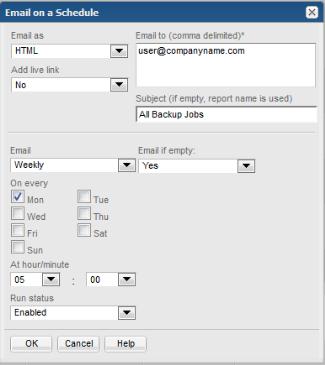
Email as | • Choose the preferred output format: HTML, CSV, Excel, Text, HTML image, PDF, or XML (.xml). Selecting Text provides the option to set a delimiter and use quotes in the emailed file. Note: XML is not available as an export type for dashboards. |
Email to | Provide a comma-separated list of email addresses. |
Add live link | You can add a link to the report within the Portal. After logging in, a user can view the report within the Portal. |
Subject | Specify an email subject if you want to override the report title. |
Email | • On a defined schedule - Master schedules can be configured and then applied to reports. Modifications to a master schedule will automatically be applied to all the reports associated with that master schedule. See Configuring Master Schedules. • Hourly - Select 1, 2, 3, 4, 6, or 12 hours. • Daily - At: hour/minute. Select a specific run time. • Weekly - • On every. Check the day(s) on which the report will run. • At: hour/minute. Select a specific run time. • Monthly - • On the. Select the day on which the report will run. • At: hour/minute. Select a specific run time. |
Email if empty | This option is available only when you are scheduling a tabular report to be emailed at regular intervals. Sometimes reports might not have any data. If you don’t want to email empty reports, choose No. |
Run Status | Select Enabled or Disabled. This selection enables or disables the schedule for emailing the report. |