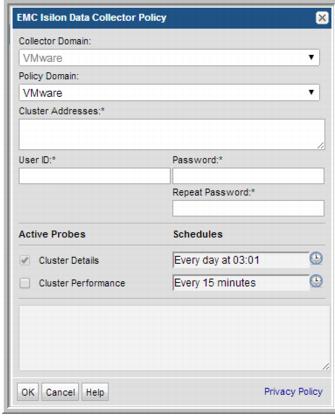

Field | Description | Sample Value |
Collector Domain | The domain of the collector to which the collector backup policy is being added. This is a read-only field. By default, the domain for a new policy will be the same as the domain for the collector. This field is set when you add a collector. | |
Policy Domain | The Collector Domain is the domain that was supplied during the Data Collector installation process. The Policy Domain is the domain of the policy that is being configured for the Data Collector. The Policy Domain must be set to the same value as the Collector Domain. The domain identifies the top level of your host group hierarchy. All newly discovered hosts are added to the root host group associated with the Policy Domain. Typically, only one Policy Domain will be available in the drop-down list. If you are a Managed Services Provider, each of your customers will have a unique domain with its own host group hierarchy. To find your Domain name select Admin > Hosts and Domains > Domains. | |
Domain | The domain identifies the top level of your host group hierarchy. The name was supplied during the installation process. All newly discovered hosts are added to the root host group associated with this domain. Typically, only one Domain will be available in the drop-down list. If you are a Managed Services Provider, each of your customers will have a unique domain with its own host group hierarchy. To find your Domain name, in the menu list at the left of the Portal window, click Admin > Hosts and Domains > Domains to view the list. | yourdomain |
Cluster Addresses* | Enter the external address of a single node within each EMC Isilon cluster. | |
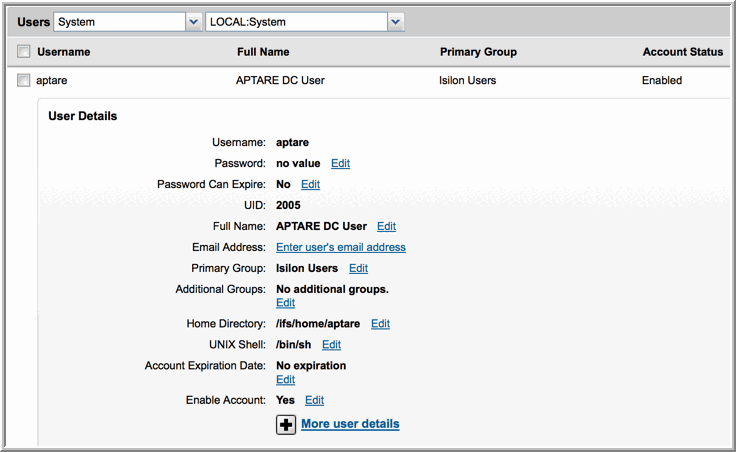
User ID and Password* | SSH User ID and password for accessing the EMC Isilon cluster. | |
Cluster Details Schedule | Click the clock icon to create a schedule. Every Minute, Hourly, Daily, Weekly, and Monthly schedules may be created. Relative schedules are relative to when the Data Collector is restarted. Advanced use of native CRON strings is also available. Examples of CRON expressions: */30 * * * * means every 30 minutes */20 9-18 * * * means every 20 minutes between the hours of 9am and 6pm */10 * * * 1-5 means every 10 minutes Mon - Fri. | Every day at 03:01 |
Cluster Performance Schedule | Check the check box to activate cluster performance collection to populate performance metrics for EMC Isilon clusters. Click the clock icon to create a schedule. Every Minute, Hourly, Daily, Weekly, and Monthly schedules may be created. Relative schedules are relative to when the Data Collector is restarted. Advanced use of native CRON strings is also available. Examples of CRON expressions: */30 * * * * means every 30 minutes */20 9-18 * * * means every 20 minutes between the hours of 9am and 6pm */10 * * * 1-5 means every 10 minutes Mon - Fri. | Every 15 minutes |
SNMP v1 and v2c only | • Enable access:  • If SNMP v2c is allowed, then the read-only community string must be set.  |
SNMP v1, v2c, and v3 | • Enable access:  • When SNMP v2c is allowed, the read-only community string must be set.  • When SNMP v3 is allowed, the read-only user and SNMP v3 password must both be set. The SNMP password for Isilon must be at least 8 characters long.  |
SNMP v3 is allowed, but SNMP v2c is not allowed | • Enable access.  • When SNMP v3 is allowed, the read-only user and SNMP v3 password must both be set. The the SNMP password for Isilon must be at least 8 characters long.  • The following additional configuration is required at the command line, on each cluster node that is configured in the Data Collector policy. 1. Log in to the node as root and change to the root user home directory. # cd /root 2. Create the .snmp directory and make it accessible only to the root user. # mkdir .snmp # chmod 700 .snmp # ls -ld .snmp drwx------ 2 root 512 Sep 18 15:00 .snmp 3. Modify or create.snmp/snmp.conf, using nano or another editor, to add the following line, replacing <snmp v3 password> with the password entered in the SNMP v3 Settings. defAuthPassphrase <snmp v3 password> 4. Save .snmp/snmp.conf and make it accessible only to the root user. # chmod 600 .snmp/snmp.conf # ls -l .snmp/ total 1 -rw------- 1 root 129 Sep 18 15:02 snmp.conf |
