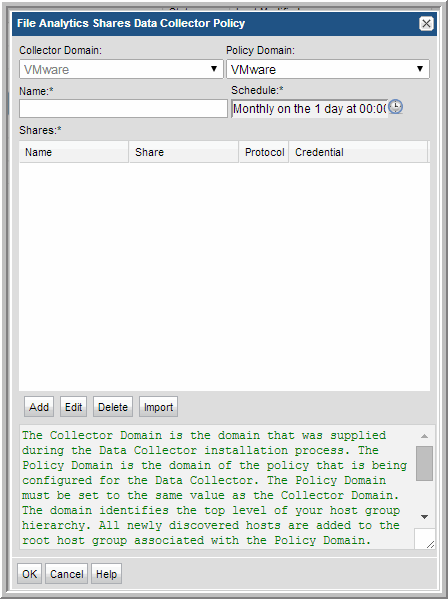
1. Click Add and select File Analytics Share.

Field | Description | Sample Values |
Collector Name* | Click Change to edit the unique name assigned to this Data Collector. The Data Collector will use this value for authentication purposes. Changing the Collector ID or passcode requires manual changes to the corresponding Data Collector server. Collection will break if these corresponding changes are not made. See User ID and Passcode on the Data Collector Server. | BUEdc1 TSMdc1 HRdc1 |
Passcode* | Click Change to edit the passcode assigned to this Data Collector. It can be any character sequence. Unlike other StorageConsole passwords (which are encrypted and then saved) this Data Collector passcode is not encrypted prior to saving in the StorageConsole database and may appear as clear case in certain files. It simply is intended as a “handshake” identification between the data collector and the policy. Changing the Collector ID or passcode requires manual changes to the corresponding Data Collector server. Collection will break if these corresponding changes are not made. See User ID and Passcode on the Data Collector Server. | Password1 |
Short Notes | Descriptive notes associated with this Data Collector. | |
Enable SSL | Both secure (SSL) and non-secure Data Collectors can send data to the same Portal. Check this box to select the secure communication protocol (https) that the Data Collector will use. This check box will not appear in the dialog box if SSL is not enabled in your environment. The Portal data receiver must be listening for https traffic; for example: https://agent.mycollector.com | |
Auto-upgrade aptare.jar | Indicate if you want this configuration file upgraded automatically. This part of the Data Collector is responsible for event and metadata processing threads. The .jar file contains the processing and parsing logic for data collection. The latest versions can be downloaded automatically and applied to the collector during upgrades. It is recommended that this setting be set to Yes. | Yes |
Auto-upgrade Upgrade Manager | Indicate if you want this configuration bundle upgraded automatically. This data collector component is responsible for managing Data Collector upgrades. The latest versions can be downloaded automatically and applied to the collector during upgrades. It is recommended that this setting be set to Yes. | Yes |

Field | Description | Sample Value |
Collector Domain | The domain of the collector to which the collector backup policy is being added. This is a read-only field. By default, the domain for a new policy will be the same as the domain for the collector. This field is set when you add a collector. | |
Policy Domain | The Collector Domain is the domain that was supplied during the Data Collector installation process. The Policy Domain is the domain of the policy that is being configured for the Data Collector. The Policy Domain must be set to the same value as the Collector Domain. The domain identifies the top level of your host group hierarchy. All newly discovered hosts are added to the root host group associated with the Policy Domain. Typically, only one Policy Domain will be available in the drop-down list. If you are a Managed Services Provider, each of your customers will have a unique domain with its own host group hierarchy. To find your Domain name select Admin > Hosts and Domains > Domains. | |
Domain | The domain identifies the top level of your host group hierarchy. The name was supplied during the installation process. All newly discovered hosts are added to the root host group associated with this domain. Typically, only one Domain will be available in the drop-down list. If you are a Managed Services Provider, each of your customers will have a unique domain with its own host group hierarchy. To find your Domain name select Admin > Hosts and Domains > Domains. | yourdomain |
Name* | Enter a name that will be displayed in the list of Data Collector policies. | WindowsFiles |
Schedule* | Click the clock icon to create a schedule. Every Minute, Hourly, Daily, Weekly, and Monthly schedules may be created. Relative schedules are relative to when the Data Collector is restarted. Advanced use of native CRON strings is also available. Examples of CRON expressions: */30 * * * * means every 30 minutes */20 9-18 * * * means every 20 minutes between the hours of 9am and 6pm */10 * * * 1-5 means every 10 minutes Mon - Fri. | |
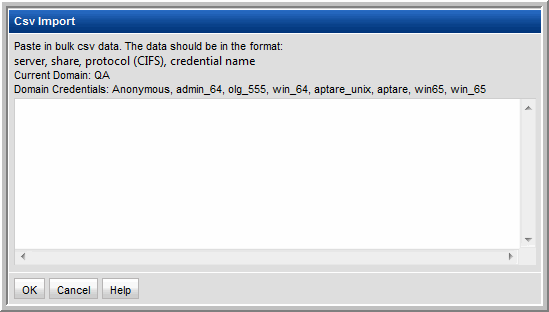
Shares* | Click Add to configure the CIFS shares that the collector will probe. Note that the Import button in this window enables bulk loading of CIFS shares. See Importing the CIFS Share Configuration. |

Field | Description | Sample Value |
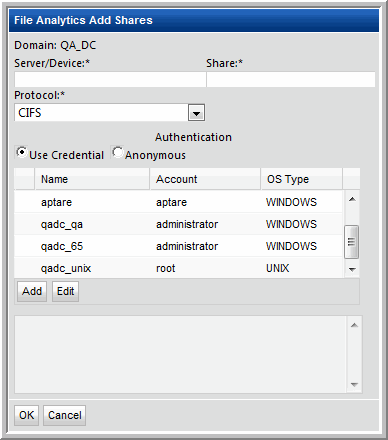
Host/Device* | Enter the host IP address or host name for the device that is being probed for CIFS shares. This also could be a non-host device, such as a NetApp array. | 172.1.1.1 |
Share* | Enter the name of the CIFS share that the Data Collector will probe. | HOME |
Protocol* | CIFS is currently the only option. | |
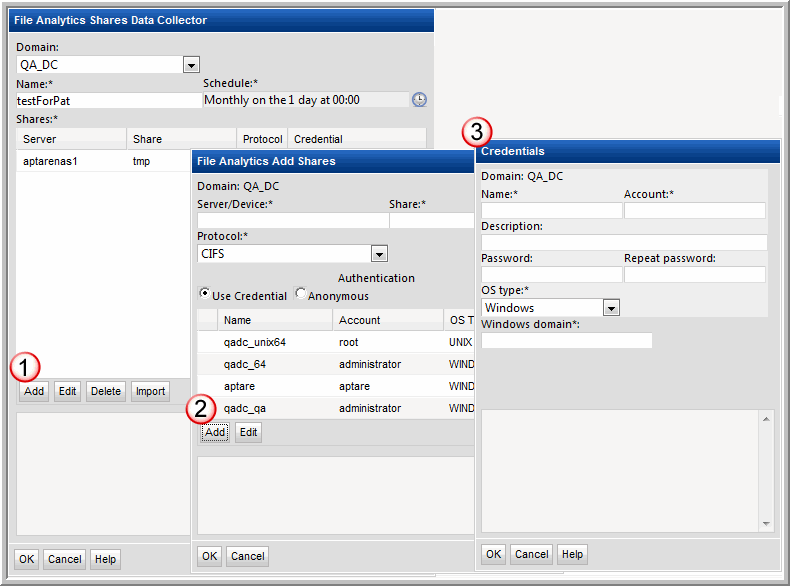
Authentication | Click either Anonymous or Use Credentials. If you are using credentials, click Add to configure the CIFS share credentials, or select an existing credential definition and click Edit. |

Field | Description | Sample Value |
Name* | Assign a name to identify the set of credentials that you are defining. | |
Account* | Enter the login account name used to log in to the hosts. If the policy includes a group of Windows hosts, use the Windows Domain user ID. This user ID must have administrative privileges. For Linux hosts, super-user root privileges are required. You also could use an access control command, such as sudo, sesudo, or pbrun. If using any of these access commands, ensure that the user ID has sudo, sesudo, or pbrun privileges. Some enterprises prefer to create a new user and provide access to commands via an access control command. | root |
Description | Enter a note to help identify the credential. | |
Password | Enter the password for the account | |
OS Type* | Select either Windows, Linux, or NAS | |
Windows Domain* | For Windows hosts only: Specify the Windows domain name. If the host is not a member of a domain, or to specify a local user account, use a period (.) | |
Private Key File | For Linux hosts only: If you have configured a Public/Private Key between your Data Collector server and the hosts you intend to monitor, specify the location of the Private Key file on the Data Collector Server. | |
Known Hosts File | For Linux hosts only: If you have configured a Public Key/Private Key between your Data Collector server and the hosts you intend to monitor, specify the location of the Known Hosts file on the Data Collector Server. |
