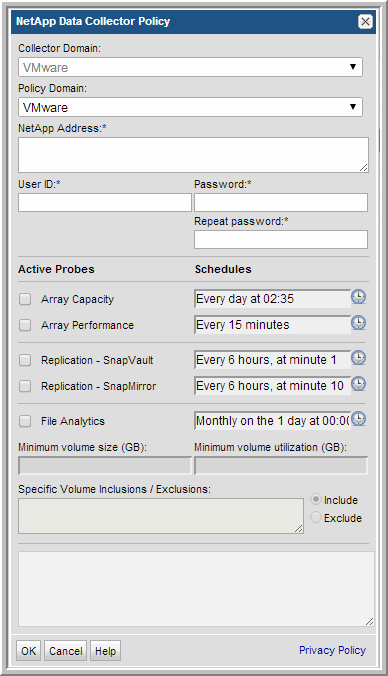
.


Field | Description | Sample Value |
Collector Domain | The domain of the collector to which the collector backup policy is being added. This is a read-only field. By default, the domain for a new policy will be the same as the domain for the collector. This field is set when you add a collector. | |
Policy Domain | The Policy Domain is the domain of the policy that is being configured for the Data Collector. The Policy Domain must be set to the same value as the Collector Domain. The domain identifies the top level of your host group hierarchy. All newly discovered hosts are added to the root host group associated with the Policy Domain. Typically, only one Policy Domain will be available in the drop-down list. If you are a Managed Services Provider, each of your customers will have a unique domain with its own host group hierarchy. To find your Domain name select Admin > Hosts and Domains > Domains. | |
NetApp Address* | One or more IP addresses or host names to probe. Comma-separated addresses or IP ranges are supported. | 192.168.0.1-250, 192.167.1.10, myhost |
User ID* | The view-only user ID for NetApp storage. | |
Password* | The password associated with the User ID. | |
Array Capacity | Check the box to collect array capacity data. Click the clock icon to create a schedule. Every Minute, Hourly, Daily, Weekly, and Monthly schedules may be created. Relative schedules are relative to when the Data Collector is restarted. Advanced use of native CRON strings is also available. Examples of CRON expressions: */30 * * * * means every 30 minutes */20 9-18 * * * means every 20 minutes between the hours of 9am and 6pm */10 * * * 1-5 means every 10 minutes Mon - Fri. | 1 */4 * * * |
Array Performance | Check the box to collect array performance data. Note that at least one collection from this array must be performed BEFORE array performance data can be collected. Click the clock icon to create a schedule. | |
Replication -SnapVault | Click the check box if you are collecting data from your NetApp SnapVault environment. Click the clock icon to create a schedule. Every Minute, Hourly, Daily, Weekly, and Monthly schedules may be created. Relative schedules are relative to when the Data Collector is restarted. Advanced use of native CRON strings is also available. This field is specific to environments licensed for Replication Manager. | |
Replication - SnapMirror | Click the check box if you are collecting data from your NetApp SnapMirror environment. Click the clock icon to create a schedule. Every Minute, Hourly, Daily, Weekly, and Monthly schedules may be created. Relative schedules are relative to when the Data Collector is restarted. Advanced use of native CRON strings is also available. This field is specific to environments licensed for Replication Manager. | |
File Analytics | Click the check box to collect File Analytics data. Click the clock icon to create a schedule. Every Minute, Hourly, Daily, Weekly, and Monthly schedules may be created. Relative schedules are relative to when the Data Collector is restarted. Advanced use of native CRON strings is also available. | |
Minimum volume size (GB) | The minimum volume size (in gigabytes) for File Analytics information collection. For example, a value of 1000 means that only volumes larger than 1 terabyte (1000 gigabytes) will be included in File Analytics collection. | |
Minimum volume utilization (GB) | The minimum amount of utilized space (in gigabytes) for File Analytics information collection. For example, a value of 500 means that only volumes with 500 gigabytes of used disk space will be included in File Analytics collection. | |
Specific volume Inclusions/Exclusions | Enter a comma-separated list of Volumes to be included or excluded. Select if you want volumes listed to be included or excluded. The minimum amount of utilized space (in gigabytes) for File Analytics information collection. For example, a value of 500 means that only volumes with 500 gigabytes of used disk space will be included in File Analytics collection. |