
Field | Description | Sample Value |
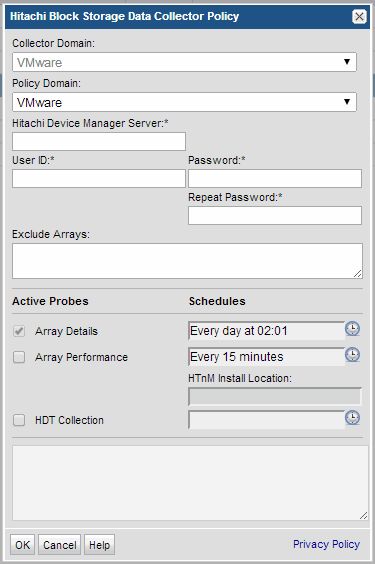
Collector Domain | The domain of the collector to which the collector backup policy is being added. This is a read-only field. By default, the domain for a new policy will be the same as the domain for the collector. This field is set when you add a collector. | |
Policy Domain | The Collector Domain is the domain that was supplied during the Data Collector installation process. The Policy Domain is the domain of the policy that is being configured for the Data Collector. The Policy Domain must be set to the same value as the Collector Domain. The domain identifies the top level of your host group hierarchy. All newly discovered hosts are added to the root host group associated with the Policy Domain. Typically, only one Policy Domain will be available in the drop-down list. If you are a Managed Services Provider, each of your customers will have a unique domain with its own host group hierarchy. To find your Domain name select Admin > Hosts and Domains > Domains. | yourdomain |
Hitachi Device Manager Server* | The address of the Hitachi Device Manager Server—either the IP address or server name. If this policy is being created to collect block storage shared with Hitachi NAS (HNAS), you must specify the IP address of the Hitachi Device Manager that manages the array that shares capacity with HNAS. See Configuring a Collector for Hitachi NAS Block Storage. | hds_server1 |
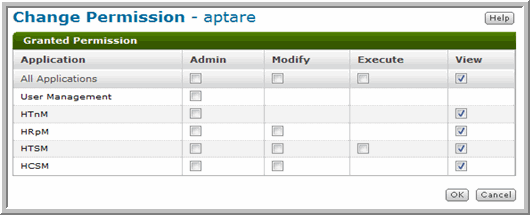
User ID* | Use the User ID and passcode as defined in Hitachi Device Manager (HDvM). This typically would be an administrator privilege, but must be a minimum privilege of a view-only user. Create a new user with view-only privileges and add the user to ViewGroup, a built-in HDvM group. See Configuring a Hitachi Device Manager User. For Hitachi Device Manager 7.1.1 and 7.2, the user ID configured to access HDvM must have view permissions to HRpM and HTSM. | Administrator |
Password* | Note: The password is encrypted prior to saving in the database and is never visible in any part of the application. | Password1 |
Exclude Arrays | Enter one or more array names to be excluded. Comma-separated names are supported. Example: USPV1_172.16.1.13, USPV1_172.16.1.14, AMS - Corporate(5100)@172.16.1.43 | |
Array Details | Click the check box to activate array details collection. Click the clock icon to set the schedule. For example: */30 * * * * means every 30 minutes */20 9-18 * * * means every 20 minutes between the hours of 9am and 6pm */10 * * * 1-5 means every 10 minutes Mon - Fri. | |
Array Performance | Click the check box to activate performance collection and enable entries and selections for the HTnM Install Location and the Performance Schedule. Note that at least one collection from this array must be performed BEFORE array performance data can be collected. Requirement: To collect performance data from Hitachi Tuning Manager, the Data Collector must be installed on the same server as Tuning Manager. And, a single Data Collector policy must be used to collect both the capacity data from the Device Manager server and the performance data from the Tuning Manager server. | |
HTnM Install Location | Specify the Tuning Manager server installation directory. By default, the Tuning Manager server will be installed in the following locations: Windows Server 2003 (x86) and Windows Server 2008 (x86): %SystemDrive%\Program Files\HiCommand\TuningManager Windows Server 2003 (x64) and Windows Server 2008 (x64): %SystemDrive%\Program Files (x86)\HiCommand\TuningManager Solaris: /opt/HiCommand/TuningManager | |
HDT Collection | Activate HDT Collection. An HDT Schedule is not required if your HDvM is not managing VSP arrays running HDT. Click the clock icon to create a schedule frequency. You can schedule the collection frequency by minute, hour, day, week and month. Relative schedules are relative to when the Data Collector is restarted. Advanced use of native CRON strings is also available. |

DeviceManagerIP | Hitachi Device Manager IP address |
2001 | Default port number allocated to this server |

