Exporting Reports and Dashboards
You can export reports to make them available to external applications, such as Microsoft Excel or if you’d like to generate a hardcopy, you can export them to a file, such as a PDF. The date on the report will be the date and time that the report was generated. Date and time are derived from the Portal Server’s time zone, which was determined when your administrator installed the Portal.
Exporting data is limited to the first 20,000 rows. Reports longer than 20,000 rows are truncated when exported. The report output (PDF, HTML, CSV, etc.) displays the message “Data in this report has been truncated.”
NOTE: The exporting procedures described in this section should not be confused with exporting a Custom Report definition (created in the SQL Template Designer or Dynamic Template Designer). This information can be found in
Exporting/Importing Report Templates.
To export report or dashboards
2. Click Actions and select Export with the report displayed.
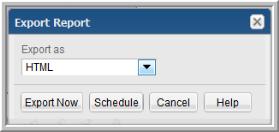
3. In the Export Report/Dashboard dialog box, choose the format. The report type dictates the available export options. Not all export types are available for all report types.
The following lists all potential options:
• CSV(.csv). Exports data to a spreadsheet or a database application such as Microsoft Access.
• Excel (.xls). Similar to the CSV export, this file supports MS Excel-specific features.
• XML (.xml). Accesses the web page components.
NOTE: XML is not available as an export type for dashboards.
• PDF (.pdf). This read-only file lends itself to easy distribution and printing.
• HTML image. A single image of the report.
• Text. A text file of the report.
• HTML (.html). Exports this data as a web page, along with supporting files, in a zipped file.
The Export-to-HTML process produces a .zip file with all the necessary files. Extract the files and then click report.html to display the report. Depending on your browser’s settings, the file will be saved to your default location (typically, Desktop), or a dialog box launches and requires that you specify the location for the file.
4. Click Export Now.
5. Open or Save the file.
NOTE: For portals installed on Linux servers, reports that are emailed or exported as HTML images or PDF files may produce output that includes a black box or that exceeds the size of the landscape. Verify that X Virtual Frame Buffer is installed. This graphical interface ensures that emailed and exported reports (HTML images and PDF files) are rendered correctly.
Scheduling Exported Reports and Dashboards
You can only schedule exports for saved reports and dashboards.
Exporting data is limited to the first 20,000 rows. Reports longer than 20,000 rows are truncated when exported. The report output (PDF, HTML, CSV, etc.) displays the message “Data in this report has been truncated.”
To schedule an export of a report and dashboard
1. Generate and save the report. See
Generating Reports. You can also use the quick search to located a saved report if you know the name.
2. Click Actions and select Export with the report displayed.
3. On the
Export Report dialog box, choose the format. The report type dictates the available export options. Not all export types are available for all report types.
The following lists all potential options:
• CSV(.csv). Exports data to a spreadsheet or a database application such as Microsoft Access.
• Excel (.xls). Similar to the CSV export, this file supports MS Excel-specific features.
• XML (.xml). Accesses the web page components.
NOTE: XML is not available as an export type for dashboards.
• PDF (.pdf). This read-only file lends itself to easy distribution and printing.
• HTML image. A single image of the report.
• Text. A text file of the report.
• HTML (.html). Exports this data as a web page, along with supporting files, in a zipped file.
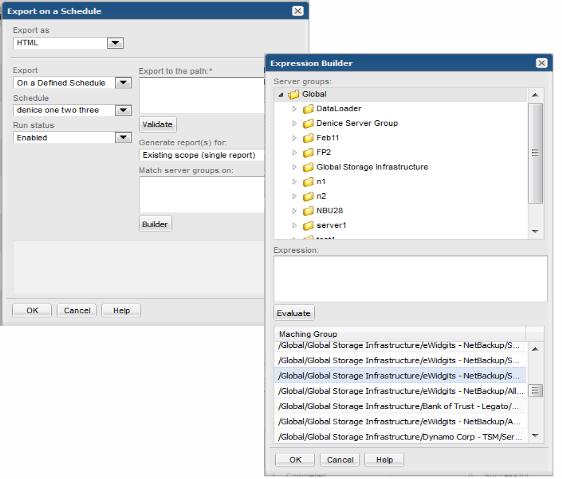
4. Click Schedule. When you schedule a report to be exported on a regular basis, you must first configure a number of settings.
5. Define the schedule.
Use the following table to configure a schedule:
Export | On a defined schedule - Master schedules can be configured and then applied to reports. Modifications to a master schedule will automatically be applied to all the reports associated with that master schedule. See Scheduling Exported Reports and Dashboards. Hourly - Select 1, 2, 3, 4, 6, or 12 hours. Daily - At: hour/minute. Select a specific run time. Weekly: On every. Check the day(s) on which the report will run. At: hour/minute. Select a specific run time. Monthly: On the. Select the day on which the report will run. At: hour/minute. Select a specific run time. |
Export to the path* | This feature enables you to deploy reports that are viewed by a large audience on a regular basis. Specify a path where the output will be saved, for example, a web server directory. You can append sub-directory information to the end of the default path name (/opt/aptare/portal/export/sample folder). Click Validate to ensure that your path specification will work. The folder must exist before the export path can be set. NOTES: For security reasons, the base path for the file export is configured in portal.properties:
portal.exportPath=/opt/aptare/exports
Exporting to a network share requires that it is already mounted on the Portal server and also configured in the portal.properties file. See the APTARE StorageConsole System Administrator’s Guide for details. The scheduler will substitute the underscore character for invalid characters. FOR ADVANCED USERS: In some cases (for example, Managed Services Providers with hundreds of managed host groups), you may want to export to specific host group or report directories. Rather than configure each of these separately, you can use the following variables in the path specification to generate an individual report for each instance of the variable: ${hostGroup} For example: /opt/aptare/export/${hostGroup}/doc ${reportName} To over-write/replace files each time the reports are exported, use the variables: ${day}, ${month}, ${year}, ${hour}, ${minute} where the day, month, year, hour, and minute are represented as 2-digits, such as 02. |
Generate reports for | Choose one of the following: • Existing scope - Creates a single report based on the report’s scope. • Matching host groups - Creates multiple reports, based on the list that results from the Expression Builder. See also Using the Expression Builder. NOTE: Dashboards cannot be exported for multiple host groups. |
Using the Expression Builder
6. Click Builder to create a regular expression to be used for searching for host group names with pattern matching.
7. Click Evaluate to view which host groups are selected.
Examples:
• .*NetBackup.* - the period specifies any character; the asterisk specifies zero or more of the preceding element.
• [abc] - simple alpha character match
• [a-zA-Z] - any alpha character in upper or lowercase
• [^abc] - any character except a, b, or c
• The Expression Builder is case-sensitive.