Before You Install the Data Collector
NOTE: These steps apply only if you are performing an IN-HOUSE installation. If a third-party service provider is hosting your Portal—that is, a HOSTED installation (perhaps for a product evaluation)—skip this section and contact your hosting organization’s representative to configure the hosted portal for your Data Collector.
Update the Local Hosts File
1. Add the Portal IP Address to the Local Hosts file on the Data Collector server or on any available client with web-browsing capabilities.
NOTE: Only edit the local hosts file if a DNS entry hasn’t already been set up in your enterprise to resolve both http://aptareportal.yourdomain.com and http://aptareagent.yourdomain.com to the Portal IP address.
a. Login to the Data Collector server.
b. On a Linux server:
vi /etc/hosts
Add entries for aptareportal.yourdomain.com and aptareagent.yourdomain.com, both resolving to the Portal server IP address.
On a Windows server:
edit C:\Windows\System32\drivers\etc\hosts
Add entries for aptareportal.yourdomain.com and aptareagent.yourdomain.com, both resolving to the Portal server IP address.
2. On the Data Collector server, add entries to the local hosts file, both resolving to the Portal server IP address.
Example:
• 172.16.2.2 aptareportal.<yourdomain>.com
• 172.16.2.3 aptareagent.<yourdomain>.com
Configure VMware Access
The Virtualization Manager Data Collector uses the VMware Infrastructure SDK to make XML API calls over HTTP to retrieve data from ESX servers. The VMware Data Collector is multi-threaded, enabling it to poll up to five vCenters in one polling cycle.
Virtualization Manager requires the following access for data collection:
1. View-only VMware User ID that has a role with the following privileges:
• Read-Only
• Browse Datastore
2. Assign the user to the root-level folder permissions of vSphere.
The administrator user who provisions the read-only role for collection must be an administrator at the root level, not just at a data center or other level. If multiple vCenters are available for administration in the client (Linked Mode), that administrator user must be provisioned at the root level for each vCenter Server from which data is collected.
3. Port 443 must be open. Data collection uses HTTPS without certificates for secure connections.
Creating a VMware Read-Only User with Required Permissions
The following procedure provides the steps for creating and configuring a vSphere user with the necessary permissions for Virtualization Manager data collection access.
1. Create a new vCenter user to be used with APTARE StorageConsole. For the purpose of the examples in this document, we’ll name the user aptare.
2. Log in to vSphere with Administrator credentials to create a user with new permissions.
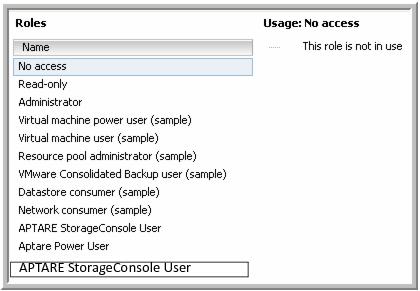
3. In the Home page (Alt+Home), click Roles under the Administration heading.
4. In the Roles window, right-click on Read Only and select Clone.
5. Name the role APTARE StorageConsole User.
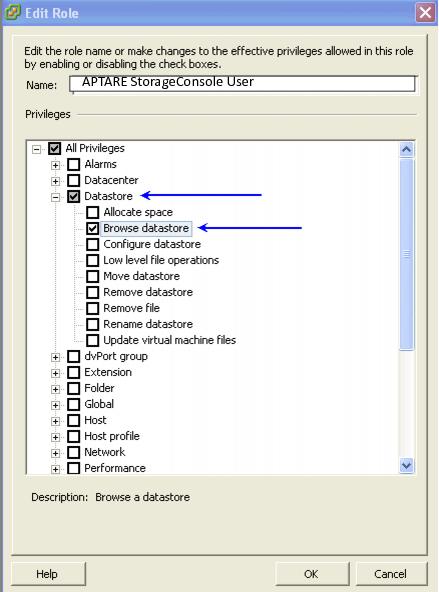
6. Right-click on the Role you just created—APTARE StorageConsole User— and select Edit Role.
7. The only permission that is required beyond the Read-Only role is Browse Datastore. Select Browse Datastore and click OK.
8. At the top of the vSphere window, select Administration > Inventory > Hosts and Clusters.
9. At the left of the vSphere window, right-click on the Root of the tree—in this example, esxvsphere—and then select Add Permission.
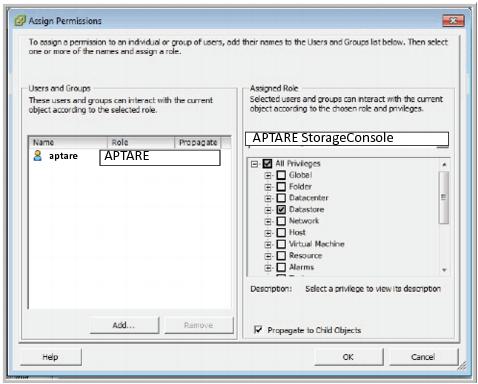
10. In the Assign Permissions window, under Assigned Role, select
APTARE StorageConsole User and under Users and Groups, add the user that you created in
Step 1 and click
OK.
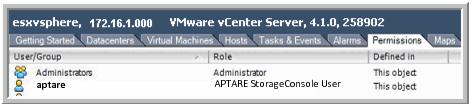
11. Once the user has been added, you should see it listed under the Permissions tab.
12. Now you are ready to add the user to the StorageConsole Portal. Be sure to enter the user name exactly as it is displayed in the Permissions tab (it is case sensitive). If you are using a Domain account, also include the Domain in the User ID field (for example: domain.com\aptare).
Adding and Editing Data Collectors
To enable the Data Collector server to pass data to the Portal server, a corresponding Data Collector must be created in the Portal, along with Data Collector Policies for each of the vendor-specific enterprise objects. Data Collector Policies are specific to the type of data that is being collected; however, multiple types of policies often can be combined within one Data Collector.
The first step is to create a Data Collector. Once created, you can add enterprise object policies to it. Often one Portal Data Collector is sufficient for adding Data Collector policies for a variety of enterprise objects such as backup servers, arrays, and switches. Only Backup Manager TSM collection requires its own Data Collector.
To Add a Portal Data Collector
1. Select Admin > Data Collection > Collectors.
The list of currently configured Portal Data Collectors is displayed. If a Data Collector has already been created, rather than creating a new Data Collector, you may want to add your collection policies to an existing Data Collector.
To Edit a Portal Data Collector
1. Select Admin > Data Collection > Collectors.
The list of currently configured Portal Data Collectors is displayed.
2. Select a Data Collector from the list.
3. Click Edit.
4. Enter or modify fields as necessary.
Field | Description | Sample Values |
Collector Name* | Click Change to edit the unique name assigned to this Data Collector. The Data Collector will use this value for authentication purposes. Changing the Collector ID or passcode requires manual changes to the corresponding Data Collector server. Collection will break if these corresponding changes are not made. See User ID and Passcode on the Data Collector Server. | BUEdc1 TSMdc1 HRdc1 |
Passcode* | Click Change to edit the passcode assigned to this Data Collector. It can be any character sequence. Unlike other StorageConsole passwords (which are encrypted and then saved) this Data Collector passcode is not encrypted prior to saving in the StorageConsole database and may appear as clear case in certain files. It simply is intended as a “handshake” identification between the data collector and the policy. Changing the Collector ID or passcode requires manual changes to the corresponding Data Collector server. Collection will break if these corresponding changes are not made. See User ID and Passcode on the Data Collector Server. | Password1 |
Short Notes | Descriptive notes associated with this Data Collector. | |
Enable SSL | Both secure (SSL) and non-secure Data Collectors can send data to the same Portal. Check this box to select the secure communication protocol (https) that the Data Collector will use. This check box will not appear in the dialog box if SSL is not enabled in your environment. The Portal data receiver must be listening for https traffic; for example:
https://agent.mycollector.com | |
Auto-upgrade aptare.jar | Indicate if you want this configuration file upgraded automatically. This part of the Data Collector is responsible for event and metadata processing threads. The .jar file contains the processing and parsing logic for data collection. The latest versions can be downloaded automatically and applied to the collector during upgrades. It is recommended that this setting be set to Yes. | Yes |
Auto-upgrade Upgrade Manager | Indicate if you want this configuration bundle upgraded automatically. This data collector component is responsible for managing Data Collector upgrades. The latest versions can be downloaded automatically and applied to the collector during upgrades. It is recommended that this setting be set to Yes. | Yes |
User ID and Passcode on the Data Collector Server
Warning: Any Portal changes to the Data Collector Policy User ID and Passcode require manual modifications on the Data Collector server. Corresponding changes must be made to files on the Data Collector server so that it can continue to communicate with the Portal.
To change the User ID and Password on the Data Collector Server
1. Find and update the User ID and Password in each of the OS-specific files listed below. These entries are typically in the last line of a long string of configuration settings.
Windows:
\<HOME>\mbs\bin\updateconfig.bat
\<HOME>\mbs\conf\wrapper.conf
Example:
\opt\aptare\mbs\bin\updateconfig.bat
\opt\aptare\mbs\conf\wrapper.conf
Linux:
/<HOME>/mbs/bin/updateconfig.sh
/<HOME>/mbs/conf/startup.sh
Example:
/opt/aptare/mbs/bin/updateconfig.sh
/opt/aptare/mbs/conf/startup.sh
NOTE: Restart the Data Collector to trigger the updates.