Managing Data Collectors and Collection Policies
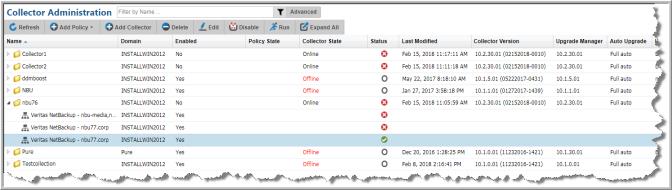
The Collector Administration view is a dashboard for data collectors and policies. In addition to the setup and management of Data Collectors and their collection policies, the Collector Administration view enables you to initiate, monitor, edit and validate the live status of your data collection all within the portal.
See also:
About Validation and Status
In addition to the setup and management of Data Collectors and their collection policies, the
Collector Administration view enables you to monitor if data collectors are running and the current status of collection. From this view, you have visibility into the status of both scheduled collection and on-demand runs, with drilldowns to more granular information available on the
Collection Status view. See
Monitoring Data Collection Status for details.
The
Collector Administration view also provides functionality to quickly initiate and validate the collection run, once collectors and policies are setup. Validation methods are initiated differently based on the subsystem vendor associated with the Data Collector policy, but perform essentially the same functions. Refer to
Data Collectors: Vendor-Specific Validation Methods for a table of vendor-specific validation methods.
For more information about validation and status refer to:
Adding/Editing Data Collectors
To enable the Data Collector server to pass data to the Portal server, a corresponding Data Collector must be created in the Portal, along with Data Collector policies for each of the vendor-specific enterprise objects. Data Collector policies are specific to the type of data that is being collected; however, multiple types of policies often can be combined within one Data Collector.
The first step is to create a Data Collector. Once created, you can add policies to it. Often one Portal Data Collector is sufficient for adding Data Collector policies for a variety of enterprise objects such as backup servers, arrays, and switches.
For information about upgrading data collectors, refer to
Upgrading Data Collectors.
To Add a Data Collector
1. Select Admin > Data Collection > Collector Administration. The list of currently configured Portal Data Collectors is displayed. If a Data Collector has already been created, rather than creating a new Data Collector, you may want to add your collection policies to an existing Data Collector.
To Edit a Data Collector
1. Search for Collector by name. Search returns results at the folder level and within the folder. See
Navigating with Search for details.
Alternatively, select Admin > Data Collection > Collector Administration to browse for a collector. A list of currently configured Portal Data Collectors is displayed.
2. Select a Data Collector from the list.
3. Click Edit.
4. Enter or modify fields as necessary.
Field | Description | Sample Values |
Collector Name* | The collector name cannot include a space and is case sensitive. The names should match exactly as entered in the Data Collector configuration screen and the Data Collector Installer screen. Edit the unique name assigned to this Data Collector. The Data Collector will use this value for authentication purposes. Changing the Collector ID or passcode requires manual changes to the corresponding Data Collector server. Collection will break if these corresponding changes are not made. See
To change the User ID and Passcode on the Data Collector Server. | BUEdc1 TSMdc1 HRdc1 |
Passcode* | Edit the passcode assigned to this Data Collector. It can be any character sequence. Unlike other system passwords (which are encrypted and then saved) this Data Collector passcode is not encrypted prior to saving in the database and may appear as clear case in certain files. It simply is intended as a “handshake” identification between the data collector and the policy. Changing the Collector ID or passcode requires manual changes to the corresponding Data Collector server. Collection will break if these corresponding changes are not made. | Test1234 |
Short Notes | Descriptive notes associated with this Data Collector. | |
Enable SSL | Both secure (SSL) and non-secure Data Collectors can send data to the same Portal. Check this box to select the secure communication protocol (https) that the Data Collector will use. This check box will not appear in the dialog box if SSL is not enabled in your environment. The Portal data receiver must be listening for https traffic; for example:
https://agent.mycollector.com | |
Auto-upgrade aptare.jar | Indicate if you want this configuration file upgraded automatically. This part of the Data Collector is responsible for event and metadata processing threads. The .jar file contains the processing and parsing logic for data collection. The latest versions can be downloaded automatically and applied to the collector during upgrades. It is recommended that this setting be set to Yes. | Yes |
Auto-upgrade Upgrade Manager | Indicate if you want this configuration bundle upgraded automatically. This data collector component is responsible for managing Data Collector upgrades. The latest versions can be downloaded automatically and applied to the collector during upgrades. It is recommended that this setting be set to Yes. | Yes |
To change the User ID and Passcode on the Data Collector Server
1. Find and update the User ID and Passcode in each of the OS-specific files listed below. These entries are typically in the last line of a long string of configuration settings.
Windows:
\<HOME>\mbs\bin\updateconfig.bat
\<HOME>\mbs\conf\wrapper.conf
Example:
\opt\aptare\mbs\bin\updateconfig.bat
\opt\aptare\mbs\conf\wrapper.conf
Linux:
/<HOME>/mbs/bin/updateconfig.sh
/<HOME>/mbs/conf/startup.sh
Example:
/opt/aptare/mbs/bin/updateconfig.sh
/opt/aptare/mbs/conf/startup.sh
Note: Restart the Data Collector to trigger the updates.
Enabling/Disabling Data Collectors
You can enable and disable a Data Collector through the Portal. When you disable a collector, it stops the service/process running on the data collector server and stops all collection. When collectors are disabled, you can still edit schedules and parameters. To start collection after a Data Collector has been disabled, you must enable the Collector in the Portal, and start the Data Collection service/process on the Data Collector server.
To enable/disable a data collector
Alternatively, you can browse for a collector. Select Admin > Data Collection > Collector Administration. A list of Data Collectors is displayed.
2. Select the Data Collector.
3. Click Disable or Enable. When you disable a Data Collector all policies within the folder are also deactivated. You can also keep a collector enabled and disable individual policies.
Enabling and Disabling Data Collection Policy Schedules
Enable and disable individual data collection policy schedules through the Portal. When you disable a policy, it deactivates the collection schedule. When policies are disabled, you can still edit them.
Note: When you disable a Data Collector all policies associated with it are suspended. When you enable the Data Collector, the policies resume their initial status. See also
Enabling/Disabling Data Collectors.
To enable/disable a data collector policy
Alternatively, you can browse for a policy. Select Admin > Data Collection > Collector Administration. A list of Data Collectors is displayed.
2. Select a Data Collector.
3. Open the folder and select a policy.
4. Click Enable or Disable.
Reviewing Collectors and Collection Status
The status of your Data collection is comprised of multiple conditions, the state of the Collector, is it online or offline, are policy schedules active or stopped, is a scheduled collection run in progress or is an On-Demand run waiting? All of these conditions and others make up the current status of the Data Collector. The Collector Administration view provides this summary-level status. From this view, you have visibility into the status of both scheduled collection and on-demand runs, with drilldowns to more granular information available on the Collection Status view.
Status for collectors and policies are an aggregate value. Any collection failure on a probe, results in a Failure status for the policy, and any failure on a policy results in a Failure status for the Data Collector. When determining a status for a data collector policy, the status of individual probes are rolled up to create a value for the last time collection was attempted. For example, if collection has failed for a certain enabled probe, the status of the policy would be failed.
Known Limitations for Policy States in Collector Administration
Due to the nature of certain types of collected data, the Collector Administration view cannot always display states for all collected policies.
The following table lists the exceptions, where the collected subsystems cannot be fully represented in the view.
Collected Subsystem | Licensed Module | Policy State |
- CIFS | | No explicit start and finish transactions are collected, so only the Policy State displayed is Collecting or No Status. |
Host Resources | | The Policy State displayed is No Status. |
To view collector status
Alternatively, you can browse for a collector. Select Admin > Data Collection > Collector Administration. A list of Data Collectors is displayed.
2. Select the Collector.

3. View the Collector State and the Status.
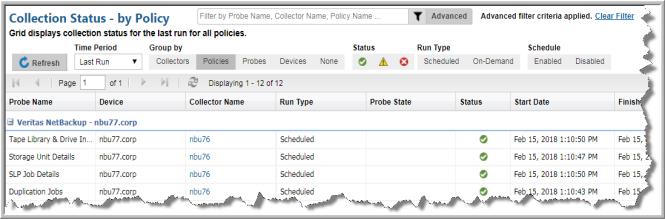
4. Click the Status icon to drill down to the Collection Status page. The information displayed on the Collection Status page is filtered by the Data Collector you are viewing.
Column Title | Description |
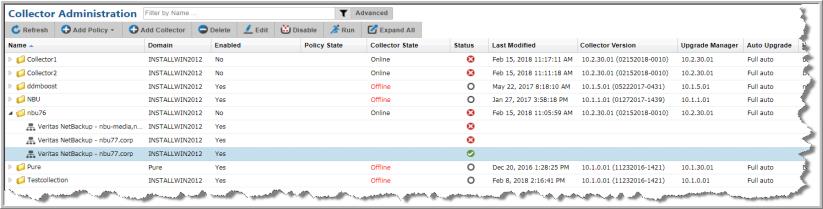
Collector State | Indicates if the Collector services are running and if the handshake has occurred. Values • Online • Offline - Indicates the collector is shut down, or the collector cannot connect to the Data Receiver. To restart the Collector, it must be Enabled through the Portal and the Collector service must be manually started on the Data Collector server. See
Enabling/Disabling Data Collectors. |
Status | Indicates an aggregated status of the last run for each probe for a scheduled collection on all associated enabled policies. Click the Status icon to drill down to the Collection Status page for a more granular view of the status information. See
Monitoring Data Collection Status. Values • Success (green check mark) - All probes are green. • Warning (yellow triangle) - At least one probe is yellow. • Failure (red X) - Action required. If any scheduled probe run has failed, the status is red. • Unknown (white circle) - No status available or the collector has been turned off. |
To view the policy status
Alternatively, you can browse for a policy. Select Admin > Data Collection > Collector Administration. A list of Data Collectors is displayed.
2. Select the Collector and click the expand icon to view the associated policies.
3. View the Enabled, Policy State, and the Status.
4. Click the
Status icon to drill down to the
Collection Status page. The information displayed on the
Collection Status page is filtered by the Policy you are viewing.
Column Title | Description |
Enabled | Indicates if the policy schedule is enabled or if it has been manually disabled. Values • Yes • No - No scheduled probes will run, however On-Demand runs can be started. |
Policy State | Indicates the collection policy state. This can be either scheduled or on-demand. Values • Waiting - Collection has been initiated, but not started. If a collection is on a schedule, an on-demand run will wait for the scheduled run to complete before starting. • Collecting - Collection has been initiated and in-progress. Note: Policy State does not automatically refresh. Click Refresh to update the display in the grid. |
Status | Indicates an aggregated status of the last set of enabled probes run for a scheduled or on-demand collection. Click the Status icon to drill down to the Collection Status page for a more granular view of the status information. See
Monitoring Data Collection Status. Values • Success - All probes are green. • Warning - At least one probe is yellow. • Failure - Action required. If any scheduled probe run has failed, the status is red. • Unknown - No status available or the collector has been turned off. |
Deleting a Data Collector
When you delete a Data Collector from the Portal, the collector and any policies associated with it will be deleted from the Portal and the database.
To delete a data collector
Alternatively, you can browse for a collector: Admin > Data Collection > Collector Administration. A list of collectors is displayed.
Upgrading Data Collectors
The Data Collector Upgrader provides options to manually upgrade to the latest Data Collector logic. Updates can be downloaded to the Portal server (see
To deploy updates to collectors). From the Portal server, you can push the updates out to individual Data Collector servers (see
To deploy updates to collectors).
Upgrade aptare.jar
This part of the Data Collector is responsible for event and metadata processing threads.
Update Upgrade Manager
The Upgrade Manager is responsible for all Data Collector upgrade activities.
To deploy updates to collectors
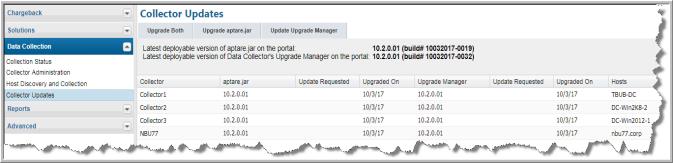
1. Select Admin > Data Collection > Collector Updates.
Collectors that are not running the current version have the version number displayed in red.
To download the latest version, click one of the following:
• Upgrade Both
• Upgrade aptare.jar
• Update Upgrade Manager