Clustering Data Collectors with VCS and Veritas NetBackup (Windows)
These instructions cover configuring APTARE data collectors on a Veritas Infoscale Availability (VCS) with NetBackup running on Microsoft Windows.
Prerequisites
• Veritas NetBackup (NBU) is installed and configured on the Veritas Infoscale Availability (VCS) with clustered nodes in a clustered mode.
• Veritas NetBackup (NBU) data volume resides on a volume shared across cluster nodes.
• Data Collector is installed on a volume shared across cluster nodes.
• Disk groups created are dynamic clustered disk groups.
Getting with started with Data Collector clustering
1. Install the Veritas NetBackup Data Collector on shared volume attached to the active node.
2. On the same node, using the "services.msc" properties, set the startup type as Manual for the APTARE Agent and APTARE WMI Agent services.
3. On all the remaining nodes in the cluster, switch all the groups to each of the nodes and perform the following steps: install the services for the APTARE Agent and APTARE WMI Proxy explicitly as:
• APTARE Agent: <Shared_Vol>/Aptare/mbs/bin/installservice.bat
• WMI Agent:<Shared_Vol>/WMIProxyServer/bin/installservice.bat
4. On the passive node, using the "services.msc" properties, set the startup type as Manual for the APTARE Agent and APTARE WMI Agent services.
5. Update the drivers/etc/hosts file with IP and hostname mapping of aptareagent portal on all the cluster nodes.
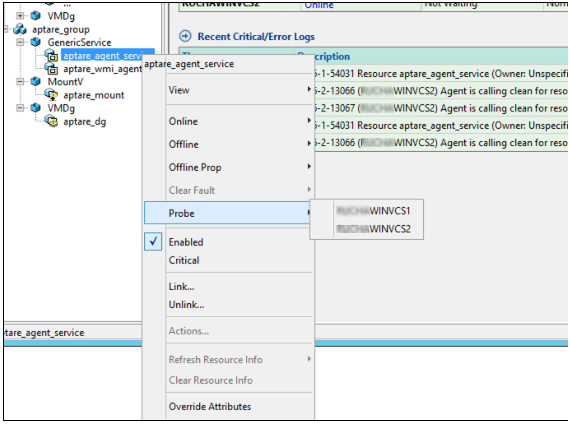
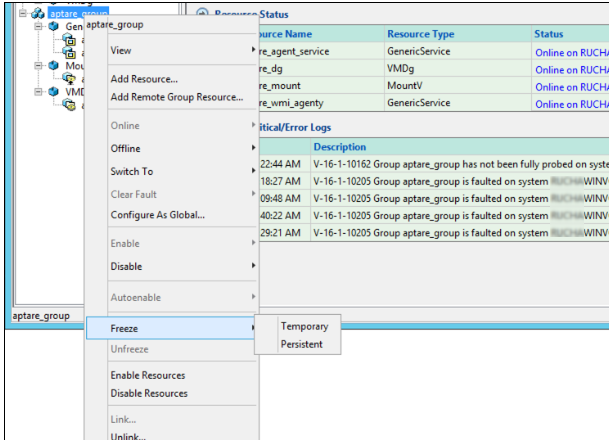
6. Using Veritas Infoscale Availability (VCS), create a separate Service group for the APTARE agent and WMI Proxy Agent. The following set of screen shots show the visual representation in VCS. There are multiple methods to set up the configuration. These instructions use the main.cf to setup. See
Main.cf for details..

Main.cf
The main.cf for the previous configuration is as follows. Please note, the following configuration uses example values as required:
include "types.cf"
include "C:\Program Files\Veritas\Cluster Server\conf\config\NetBackupVCSTypes.cf"
cluster VCSCluster (
UserNames = { admin = XXXXXXXXXX, test1 = YYYYYYYYYY }
Administrators = { admin, test1 }
)
system WINVCS1 (
)
system WINVCS2 (
)
group aptare_group (
SystemList = { WINVCS1 = 1, WINVCS2 = 2 }
)
GenericService aptare_agent_service
ServiceName = aptareagent
)
GenericService aptare_wmi_agenty (
ServiceName = APTAREWMIServer
)
MountV aptare_mount (
MountPath = "F:\\"
VolumeName = aptarevol
VMDGResName = aptare_dg
)
VMDg aptare_dg (
DiskGroupName = aptaredg
DGGuid = 8771eb0f-ae3c-4d7e-9dc2-d365a0158542
)
requires group NetBackup_Server online local hard
aptare_mount requires aptare_dg
aptare_agent_service requires aptare_wmi_agenty
aptare_wmi_agenty requires aptare_mount
// resource dependency tree
//
// group aptare_group
// {
// GenericService aptare_agent_service
// {
// GenericService aptare_wmi_agenty
// {
// MountV aptare_mount
// {
// VMDg aptare_dg
// }
// }
// }
// }
group NetBackup_Server (
SystemList = { WINVCS1 = 1, WINVCS2 = 2 }
AutoStartList = { WINVCS1, WINVCS2 }
)
IP NetBackup_Server-IP (
Address = "11.222.33.44"
SubNetMask = "222.233.244.0"
MACAddress @WINVCS1 = XX-XX-XX-XX-XX-XX
MACAddress @WINVCS2 = XX-XX-XX-XX-XX-XX
)
Lanman NetBackup_Server-Lanman (
VirtualName = plutusvm39
IPResName = NetBackup_Server-IP
)
MountV NetBackup_Server-MountV-E (
MountPath = "E:\\"
VolumeName = nbuvol
VMDGResName = NetBackup_Server-VMDg-E
)
NIC NetBackup_Server-NIC (
MACAddress @WINVCS1 = XX-XX-XX-XX-XX-XX
MACAddress @WINVCS2 = XX-XX-XX-XX-XX-XX
)
NetBackupVCS NetBackup_Server-NBU (
ResourceOwner = unknown
ServerName = exampleserv1
ServerType = NBU
)
VMDg NetBackup_Server-VMDg-E (
DiskGroupName = nbudg
DGGuid = 292ff5dd-b7ef-49cf-972e-dc903fac35bd
)
NetBackup_Server-IP requires NetBackup_Server-NIC
NetBackup_Server-Lanman requires NetBackup_Server-IP
NetBackup_Server-MountV-E requires NetBackup_Server-VMDg-E
NetBackup_Server-NBU requires NetBackup_Server-MountV-E
NetBackup_Server-NBU requires NetBackup_Server-Lanman
// resource dependency tree
//
// group NetBackup_Server
// {
// NetBackupVCS NetBackup_Server-NBU
// {
// MountV NetBackup_Server-MountV-E
// {
// VMDg NetBackup_Server-VMDg-E
// }
// Lanman NetBackup_Server-Lanman
// {
// IP NetBackup_Server-IP
// {
// NIC NetBackup_Server-NIC
// }
// }
// }
// }
Upgrading a Clustered Data Collector
1. Using Veritas Infoscale Availability (VCS), verify the service group can be probed.
2. Freeze the "aptare_grp" cluster resource temporarily while the portal is being upgraded.
3. On the shared volume, ensure that the restore.txt file is not in the directory /aptare-vol/upgrade/restore.txt.
4. In the APTARE IT Analytics portal, perform the data collector upgrade using the Portal (Admin>Data Collection>Collector Upgrade); or wait for the automatic upgrade if the Data Collector is configured for it.
5. Verify the data collector has been upgraded to higher version by validating aptare-vol/aptare/upgrade/version.txt
6. In Veritas Infoscale Availability (VCS) unfreeze the "aptare_grp" cluster resource after the data collector has upgraded successfully.