Host Inventory Configuration Steps
This section contains:
Read this section first for a high-level overview, then follow the specific steps in
Before Discovering Hosts and
Host Inventory Management to configure your system for Host Data Collection.
Host Inventory Setup Overview
Note that some steps typically are required only as part of the initial configuration and rarely require additional maintenance. For the purpose of this document, these initial steps are treated as requirements
Before Discovering Hosts.
Note: Each step is summarized in this section. To access detailed descriptions, click the links for each step. The buttons at the bottom of the window—
Hide,
Remove,
Show Errors,
Validate,
Edit Probes,
Copy Probes,
Paste Probes—are described in the section,
Host Inventory Maintenance Overview.
1. Adding/Editing Data Collectors (Capacity Manager) - Prior to discovering hosts, a data collector policy must be configured. You can use an existing policy—for example, a data collector policy that has been created for Storage Array data collection—or create a new data collector policy.
2.
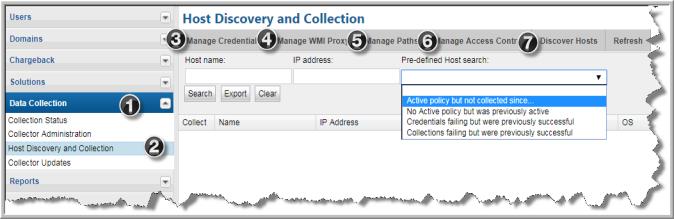
Configure/Search the Host Inventory - Using the Host Inventory window, you can search for hosts in the inventory; or you can set up configurations in preparation for discovering and configuring hosts.
•
Configure and Edit Host Probes - Many of the probes may not be applicable to your enterprise. It is essential that you identify the probes that are relevant to your hosts.
3.
Manage Credentials - Configure user IDs and passwords for authentication when the data collector is accessing hosts.
4.
Manage WMI Proxy - A WMI Proxy is required to collect data from Windows hosts. Use this option to define one or more WMI Proxies.
5.
Manage Paths - Configure the paths that data collectors will use to execute commands on hosts.
6.
Manage Access Control - Data Collectors require read-only access to execute non-intrusive commands on hosts. It is strongly recommended that a separate login account used strictly for APTARE IT Analytics be established and using Active Directory for Windows systems and the sudo command for Linux systems, restrict the commands that APTARE IT Analytics can issue. To accommodate this security approach, you can optionally specify access control commands like sudo, sesudo, or pbrun. See also,
Host Access Privileges, Sudo Commands, Ports, and WMI Proxy Requirements.
•
Validate Host Connectivity - Host validation must take into account host access for a wide variety of conditions and environments. As the discovery process accesses hosts, informative messages will provide clues to connectivity issues. In addition, devices that don’t belong in a host inventory—for example, printers in the IP address range that you specified—may have been discovered and need to be hidden or removed from the inventory.
8. Collector Log Requests - To facilitate data collection troubleshooting, you can create log requests and be notified when the logs are available. These logs can also be transferred to support for additional analysis.
Host Inventory Maintenance Overview
Once hosts have been discovered and they are listed in the Host Inventory, several options are provided to filter the list and also to manage the probes.
2. Remove Hosts- Some IP addresses may be associated with devices that simply should be removed from the inventory, although if you execute a host discovery policy, the devices will return. For details, see
Filter the Host Inventory - Hide/Unhide, Remove.
3. Show Errors - Use this feature to troubleshoot connectivity and validation issues. See
Show Errors.
4. Validate - Use this feature in combination with the Show Errors feature to troubleshoot host data collection issues. See
Validate Host Connectivity.