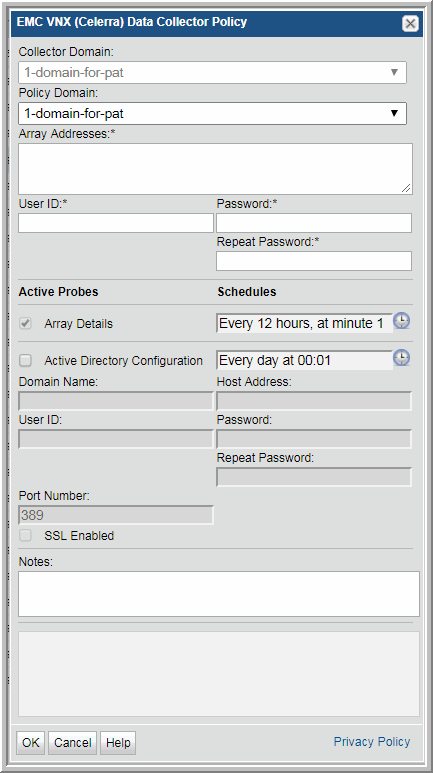

Field | Description | Sample Value |
Collector Domain | The domain of the collector to which the collector backup policy is being added. This is a read-only field. By default, the domain for a new policy will be the same as the domain for the collector. This field is set when you add a collector. | |
Policy Domain | The Collector Domain is the domain that was supplied during the Data Collector installation process. The Policy Domain is the domain of the policy that is being configured for the Data Collector. The Policy Domain must be set to the same value as the Collector Domain. The domain identifies the top level of your host group hierarchy. All newly discovered hosts are added to the root host group associated with the Policy Domain. Typically, only one Policy Domain will be available in the drop-down list. If you are a Managed Services Provider, each of your customers will have a unique domain with its own host group hierarchy. To find your Domain name, click your login name and select My Profile from the menu. Your Domain name is displayed in your profile settings. | |
Array Addresses* | Enter one or more VNX (Celerra) storage array address(es) separated by commas. List only one Control Station IP address per array. Make sure that XML API server is running. Click Help to view the steps to start the XML API server on VNX (Celerra) arrays. See Adding an EMC VNX (Celerra) Data Collector and Start the XML API Server. | |
User ID* | Enter a User ID for the VNX array. This ID must have an Operator role, which enables read-only privileges. | |
Password* | Password associated with the User ID | |
Repeat Password* | Password associated with the User ID | |
Array Details | Check the box to activate the collection of array details. Click the clock icon to create a schedule. Every Minute, Hourly, Daily, Weekly, and Monthly schedules may be created. Advanced use of native CRON strings is also available. Examples of CRON expressions: */30 * * * * means every 30 minutes */20 9-18 * * * means every 20 minutes between the hours of 9am and 6pm */10 * * * 1-5 means every 10 minutes Mon - Fri. Note: Explicit schedules set for a Collector policy are relative to the time on the Collector server. Schedules with frequencies are relative to the time that the Data Collector was restarted. | |
Active Directory Configuration | Check this box if you want the Data Collector to gather the verbose User Name from Active Directory and associate it with the appropriate VNX User ID for quota reporting purposes. Note: Once a single EMC VNX (Celerra) Data Collector policy has been configured to use Active Directory, there is no need to configure Active Directory in other VNX (Celerra) Data Collector policies, if they are all using the same directory server. Click the clock icon to create a schedule. | |
Domain Name | Enter a fully qualified Domain Name for the root of the LDAP directory tree. Use a period-separated format (example: ldap.emc.com). This example will be translated by the system to X.509 format: dc=ldap, dc=emc, dc=com. Only a single LDAP domain is supported. This is a mandatory field, if you have checked Active Directory Configuration. | |
Host Address | Enter the IP address or host name of the primary directory host that is used for authentication. This value is based on the format of the subject in the host’s certificate. This is a mandatory field if you have checked Active Directory Configuration. | |
User ID | Enter the Active Directory login name of the user account that binds to the directory server. This should be a restricted user account, such as a Domain Guest account, with directory read and search privileges. This is a mandatory field if you have checked Active Directory Configuration. | |
Password/Repeat Password | Enter the Password for the Active Directory account. This credential is used to authenticate the account. This is a mandatory field if you have checked Active Directory Configuration. | |
Port Number | Enter the network port used by Active Directory. This is a mandatory field if you have checked Active Directory Configuration. | |
SSL Enabled | Check this box if your LDAP protocol uses SSL for encryption and authentication. | |
SSL Primary Certificate File | Enter the explicit path and file name for the SSL primary certificate file. Example: C:\SSL\primaryCert.cer. This certificate is used for authentication when connecting to Active Directory. | |
Notes | Enter or edit notes for your data collector policy. The maximum number of characters is 1024. Policy notes are retained along with the policy information for the specific vendor and displayed on the Collector Administration page as a column making them searchable as well. |