Setting Up Credentials for Microsoft Azure Data Collection
To setup credentials for Azure data collection:
Install the Azure PowerShell Client on a Windows Computer
Use the Azure with Windows PowerShell to access the information required for data collection. You must execute Windows PowerShell as administrator.
To install the Azure with Windows PowerShell
1. Navigate to http://go.microsoft.com/fwlink/p/?linkid=320376&clcid=0x409 2. Select all modules except Visual Studio.
Find Your Tenant and Subscription ID
1. Execute Azure Windows PowerShell as an administrator.
2. At the prompt, enter:
Login-AzureRMAccount
3. Login to your Azure account. The output displayed will be similar to the following:
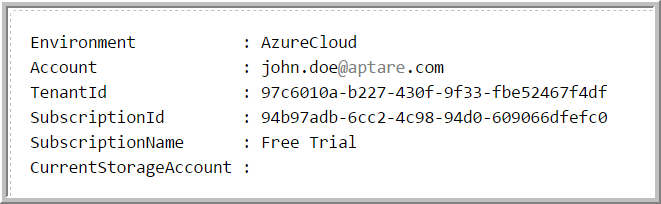
4. View the Tenant ID and Subscription ID in the output.
Register a New Application for the Data Collector
Azure requires a new Application be registered before you can interact with it.
To register a new Application for the Data Collector
You must be logged into your account within Azure Windows PowerShell. The following steps are performed at the PowerShell prompt.
1. Set the context using your Tenant ID and Subscription ID by entering:
Set-AzureRMContext -SubscriptionId 34b97gdc-6cc2-4c98-94d0-609066dfefc0 -TenantId 97a6541b-b227-430f-9f33-fbe52467f4df
The output will appear similar to the following:
2. Revise the password and then copy/paste the following at the prompt:
$azureAdApplication = New-AzureRmADApplication -DisplayName APTAREAzureConnector -HomePage "http://aptareazureconnector" -IdentifierUris "http://aptareazureconnector" -Password yourpasswordhere
3. Enter the following to display your application parameters:
$azureAdApplication
The output will appear similar to this:
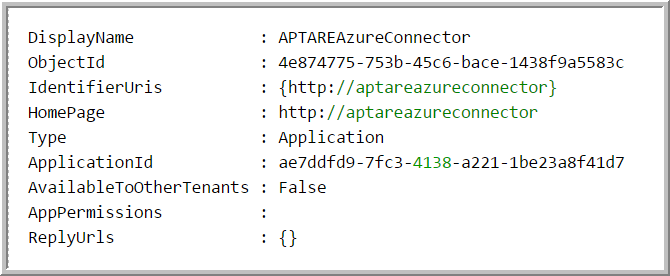
The Application ID is displayed in the output.
4. Write down the Subscription ID, Tenant ID, Application ID, and the Password you chose. The Data Collector requires those four parameters.
Create a Principal and Assign Contributor Role to the Application
This step enables the newly registered Application to have access rights to the Subscription.
1. Create a Principal for the Application:
New-AzureRmADServicePrincipal -ApplicationId ae7ddfd9-7fc3-4138-a221-1be23a8f41d7
The output will appear similar to this:

2. Create a Contributor role:
New-AzureRmRoleAssignment -RoleDefinitionName Contributor -ServicePrincipalName ae7ddfd9-7fc3-4138-a221-1be23a8f41d7
The output will appear similar to this:
