Getting Started with the Inventory Navigator
The view into your Inventory can be customized by grouping the inventory objects by a variety of attributes such as type, location or business unit to further visualize the data in a way that is the most relevant to you. Further, the information is presented in two view options, a list view and a reports view — offering you the ability to review your data in a way that makes the most business sense.
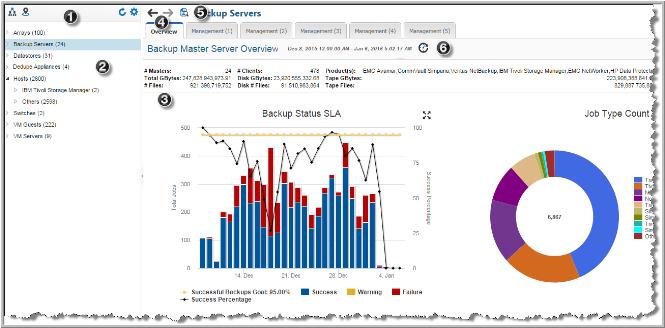
The following figure highlights key terms and functional areas in the Inventory Navigator.

1. Hierarchy Toolbar - Use the toolbar to organize the display of your inventory. Select from three options:
a Object type and subsystem (default hierarchy)
b Location and object type
2. Hierarchy Panel - Navigate through the inventory by expanding and collapsing categories. Select a category or an individual object to display relevant reports. If an attribute is used to group objects, this is easily identified in the panel. See
Using Attributes to Organize your Data.
4. Navigation Buttons - Navigate within a single session, to jump back and forward through your Inventory history. This is useful when trying to complete a root cause analysis and you need to jump between multiple objects/pages within the Inventory.
Note: Changing the hierarchy or logging out clears the Inventory history.
5. Toggle to Inventory List or Inventory Reports - Allows you to toggle between the Inventory List and the Inventory Reports for categories of objects. The previous graphic is displaying the Inventory Reports. The Inventory List displays all the collected inventory objects for a category and enables management functions.
6. Data Age Indicator - When a report is served from the cache, an indicator icon is displayed on reports and dashboards. You can roll over the indicator to show the age of the report from the cache. Click the icon to purge the old report from the cache and rerun the report from the database.
When you run a report, StorageConsole takes the scope of the report, and checks if the cache contains the same report, for the same scope. If it does, the results are displayed from the cache. If the combination does
not exist, the report is run from the database, saved in the cache, and then sent to the user interface. Cached reports are shared across users who belong to the same home host group. See also
How Reports and Caching Work Together.
Using the Hierarchy Toolbar to Organize Your Data
Use the Hierarchy toolbar to organize the view of your collected inventory.
Note: Not all selection combinations are valid. Invalid combinations may result in duplicate folder names or inaccessible folder structures. For example, using VMWare, if you remove the top level Inventory Object Type from the hierarchy selections, duplication can occur as follows:
VM Guests
VMWare
Guest1
Guest2
VM Servers
VMWare
ESX1
ESX2
Inventory Object Limits
The Inventory view is designed to manage large scale environments, with up to:
• Arrays: 1,000 max
• Backup Servers: 1,000 max
• Datastores: 10,000 max
• Dedupe Appliances: 1,000 max
• Hosts: 100,000 max
• LUNs: 350,000 max
• Switches: 10,000 max
• VM Guests: 100,000 max
• VM Servers: 10,000 max
For environments with total object numbers reaching the maximum values, your browser vendor/version may not be able to render all the objects. If your browser cannot accommodate the volume, you can reduce the total number of items displayed in the Inventory. Use Show Objects to manage the object types displayed in the Inventory.
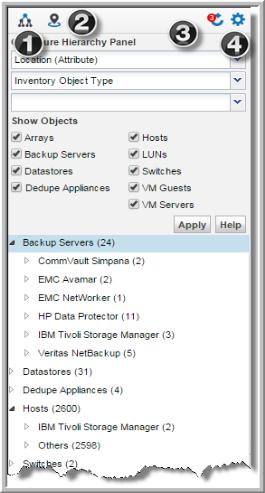
The toolbar includes:
1. Default Hierarchy - Lists the inventory object type as the first-level category and vendor subsystem as the second. For example, Arrays is the top category and EMC Symmetrix would be the second-level category.
2. Location - Assigns a two-level selection for the location attribute, Location and Inventory Object Type. Working with this attribute, you can organize the view into your data center by location.
3. Refresh - When additions or deletions occur in the Inventory, the Hierarchy Panel does not automatically reflect the update. The Refresh icon displays a numeric badge to indicate changes have been detected.
4. Configure - Customize the hierarchy of your Inventory view up to three levels using the Hierarchy Panel. There are two predefined organization settings, object type and subsystem vendor, and location and object type.
Under Configure Hierarchy Panel, you can also select your own multi-level organization.
Show Objects
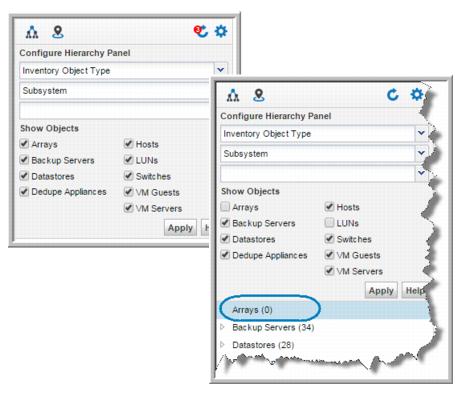
Use Show Objects to control the display of items in the Hierarchy Panel. If your browser limitations, (browser type, version and available memory) cannot accommodate the volume in your datacenter, you can reduce the total number of items displayed in the Inventory by de-selecting objects. You must select at least one object.
Note: LUNs are deselected by default for most user roles. This is to address possible performance issues as related to the volume of LUN data. You can always select LUNs and click Refresh to display the objects in the Inventory.
When you deselect an object, it is still displayed in the
Inventory Hierarchy Panel, but the count value is shown as zero.

Using Attributes to Organize your Data
You can use attributes to organize your inventory data. Once set up, these attributes are available for selection in the Hierarchy Panel. Attributes must have values associated with them before they can be used to organize your Inventory view. When viewing the Hierarchy Panel, the attribute name is prepended to the attribute value.
System Attributes
Note: There are a number of predefined system attributes available including:
• Application
• Business_Unit
• Data_Center
• Department
• Environment
• Location
• Organization
• Owner
• Region
Create custom attributes to further characterize an object with relevant properties. For example, you could create an attribute named Service_Required and set the attribute values as dates, and then assign it to your different Backup Servers. This would enable you to assign these properties to specific inventory types and organize the
Inventory View by Service_Required. See
Managing Attributes.
To set up a custom hierarchy view
1. Click Inventory.
2. Click the Configure icon.
3. Select a top-level category from the first drop down. This is a required selection. For multi-tenancy environments, such as MSPs, the first selection could be Domain. You can select up to three custom levels, but are only required to choose one.
Not all selection combinations are valid. Invalid combinations may result in duplicate folder names or inaccessible folder structures.
Note: Click the Default Hierarchy icon to return to the initial Inventory Object Type > Subsystem vendor hierarchy.
4. Click Apply when you complete all selections.


