Identify HP Data Protector Collection Requirements
Two approaches can be taken when configuring collection from the HP Data Protector Cell Manager:
• Distributed Configuration: HP Data Protector Cell Manager and StorageConsole Data Collector on the same server
• Centralized Configuration (Preferred): HP Data Protector Cell Manager and StorageConsole Data Collector on different servers.
Cell Manager Commands for Data Collection
When gathering data from HP Data Protector Cell Manager, several commands are executed, both on the Cell Manager server and on the Data Collector server. These commands are referenced later in this document.
For the purpose of preparing your environment for data collection, refer to the following table:
On the Data Collector Server | On the HPDP Cell Manager Server |
omnicc | omnidbutil |
omnicellinfo | |
omnidb | |
omnidownload | |
omnimm | |
omnirpt | |
Preparing for Centralized Data Collection on a Remote Cell Manager
Assumption: The following steps assume that HP Data Protector Cell Manager has been installed on a server that is not the same as the APTARE StorageConsole Data Collector server.
The following information will be used later when you configure a Data Collection Policy via the APTARE StorageConsole Portal (See
Adding/Editing Data Collectors).
On the HP Data Protector Cell Manager Server:
1. Identify the Cell Manager Server’s Name: ________________________________
2. Identify the OS of the Cell Manager Server: ________________________________
3. Identify the directory where the Cell Manager is installed. This path will be used later to fill in the Remote Software Location field when you configure the Data Collector policy in the StorageConsole Portal: ____________________________________
Typically, this location will be:
Windows: C:\Program Files\Omniback
Linux: /opt/omni
4. If the Data Collector is installed on a Linux OS, a WMI Proxy Server must be installed on a Windows system in order to collect data from a Cell Manager that is installed on a Windows system.
6. The omnidbutil command is executed on the Cell Manager server to obtain drive status. Therefore, the following configuration is required:
The user defined in the Data Collector must be an
Admin user that the Cell Manager Server recognizes—either as a local user account or a Windows domain user account—that has
execute rights to the
omnidbutil command. See also
Configure an HP Data Protector Admin User and
Adding/Editing Data Collectors.
On the APTARE StorageConsole Data Collector Server:
1. Make sure the Data Collector server has become the HPDP client with the HPDP User Interface component installed.
Find the directory (default is: C:\Program Files\omniback\bin) where the following commands are located and verify that the following commands exist in that directory. This validates that the User Interface was installed correctly.
omnicc
omnicellinfo
omnidb
omnidownload
omnimm
omnirpt
Configure the Data Collector Server in Cell Manager (HP Data Protector)
When a Data Collector is configured in HPDP Cell Manager, it becomes a Client of Cell Manager. Therefore, the following requirements need to be considered.
Requirements for the Data Collector (Windows)
• Microsoft implementation of the TCP/IP protocol must be installed and running. The protocol must be able to resolve hostnames; and the computer name and hostname must be the same.
• Ensure that network access user rights are set under the Windows local security policy for the account performing the installation.
Steps to Configure the Data Collector Server in Cell Manager
The HP Data Protector UI can be deployed in a number of ways. The steps you take depend on whether you are using the original Data Protector UI (Windows only) or the Data Protector Java UI. Details for both user interfaces are provided in the steps below.
On the HP Data Protector Cell Manager Server:
1. Start the HP Data Protector UI (choose one of the following User Interfaces).
• Original Data Protector UI (Windows only):
Start > Programs > HP Data Protector > Data Protector Manager
• Data Protector Java UI (Windows):
Start > Programs > HP Data Protector > Data Protector Java GUI Manager
Then, in the Connect to Cell Manager dialog, select or type the name of the Cell Manager and click Connect.
• Data Protector Java UI (Linux):
/opt/omni/java/client/bin/javadpgui.sh
Configure an HP Data Protector Admin User
Note: If the Data Collector is installed on the same server as Cell Manager, skip this section.
If the Data Collector is installed on a different server from the Cell Manager Server, the following tasks must be performed.
On the HP Data Protector Cell Manager Server:
1. Open the HP Data Protector UI.
2. Make sure you have a user that is a Local System Administer account from the Data Collector Server.
• Switch to the User context and add the user under an “Admin” class.
Validate HP Data Protector Setup
On the APTARE StorageConsole Data Collector Server:
1. Execute the following commands from the HP Data Protector backup software location to validate that the setup conditions have been meet:
omnicc -version –server <CellManagerServerName>
omnicc -check_licenses –server <CellManagerServerName>
• If the first command does not run correctly, it means that the User Interface component has not been installed correctly.
• If the first command runs, but the second command displays, “Insufficient permissions. Access denied,” it means that the configuration of the Data Collector Server in the HP Cell Manager Server has failed.
Add HP Cell Manager Servers to StorageConsole
On the APTARE StorageConsole Portal, repeat these steps for each HP Data Protector Cell Manager Server.
1. Open a browser window and point it to your instance of the Portal
(for example: http://aptareportal.yourdomain.com).
2. Login as an admin user (e.g.
admin@yourdomain.com).
3. In the Portal toolbar at the top of the window, select:
4. Select Admin > Hosts and Domains >Hosts and Host Groups
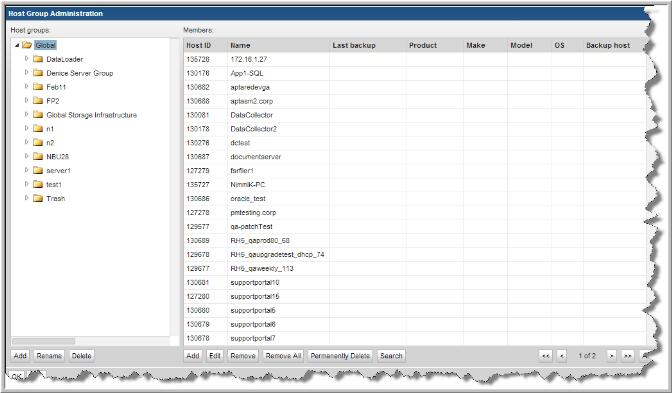
The Host Groups Administration window displays.
5. Click on the top-level host group folder (The name of this group is configured when the Portal is first installed).
Note: If a server group hierarchy has already been established in the application, you can drill down to the host group to which you would like the HP Cell Manager Server to belong, although it is recommended that you add the HP Cell Manager Server to the top-level folder.
6. In the Host Groups Administration window, under the Members pane, click Add.
The Host Administration window displays.
7. Enter values for all of the required fields (denoted by an *) in the Host Administration window and click OK. The field, Internal Name, needs to match the host name of the HP Cell Manager Server. Ensure you select HP Cell Manager Server as the Type. The fields External Name, Make and Model are not used by the application for anything other than display purposes.
The host will be added to the host group. The Host Group window will load in the content pane, and the HP Cell Manager Server should now be included in the list belonging to the group.