Prerequisites for Adding Data Collectors (EMC Isilon)
• 64-bit OS.
• Support Java Runtime Environment (JRE) 1.7.
• For performance reasons, APTARE recommends that you do not install Data Collectors on the same server as the StorageConsole Portal. However, if you must have both on the same server, verify that the Portal and Data Collector software do not reside in the same directory.
• Install only one Data Collector on a server (or OS instance).
Required Prerequisite: Configure the Isilon SNMP Service
***Required Configuration for Isilon Data Collection***
The Isilon Data Collector requires the Isilon SNMP service to be running. SNMP data is collected using the sudo snmpbulkwalk command in an SSH session. This does not require any additional ports to be opened for SNMP.
1. In the Isilon administrative web interface, Access Management/Users, select Cluster Management > SNMP Monitoring to enable/configure SNMP. Note that the SNMP configuration is specific to an SNMP version.
2. Configure SNMP using the following tables to determine the protocol access required for your environment. Be sure to click Submit on the SNMP Monitoring page to save your configuration.
SNMP v1 and v2c only | • Enable access: 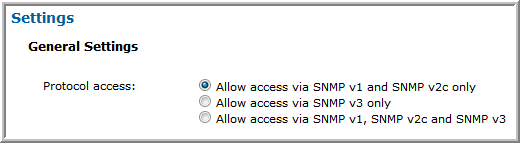 • If SNMP v2c is allowed, then the read-only community string must be set. 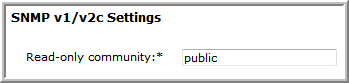 |
SNMP v1, v2c, and v3 | • Enable access: 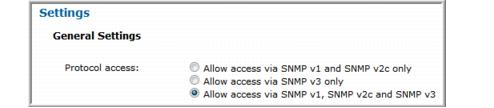 • When SNMP v2c is allowed, the read-only community string must be set. • When SNMP v3 is allowed, the read-only user and SNMP v3 password must both be set. The SNMP password for Isilon must be at least 8 characters long. 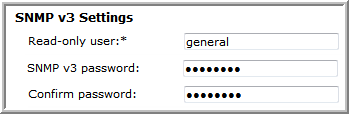 |
SNMP v3 is allowed, but SNMP v2c is not allowed | • Enable access. 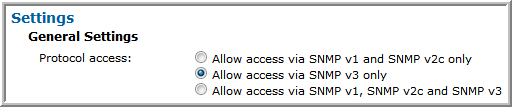 • When SNMP v3 is allowed, the read-only user and SNMP v3 password must both be set. The the SNMP password for Isilon must be at least 8 characters long. • The following additional configuration is required at the command line, on each cluster node that is configured in the Data Collector policy. 1. Log in to the node as root and change to the root user home directory. # cd /root 2. Create the .snmp directory and make it accessible only to the root user. # mkdir .snmp # chmod 700 .snmp # ls -ld .snmp drwx------ 2 root 512 Sep 18 15:00 .snmp 3. Modify or create.snmp/snmp.conf, using nano or another editor, to add the following line, replacing <snmp v3 password> with the password entered in the SNMP v3 Settings. defAuthPassphrase <snmp v3 password> 4. Save .snmp/snmp.conf and make it accessible only to the root user. # chmod 600 .snmp/snmp.conf # ls -l .snmp/ total 1 -rw------- 1 root 129 Sep 18 15:02 snmp.conf |
Optional Prerequisite: Configure Isilon Sudo Access
***Optional Configuration for Isilon Data Collection***
Collection of Isilon data requires root privileges. If your security requirements require sudo access to provide temporary, elevated privileges, use the instructions in this section.
The commands in this section are for Isilon OneFS v7.0. Verify command path names if using subsequent versions.
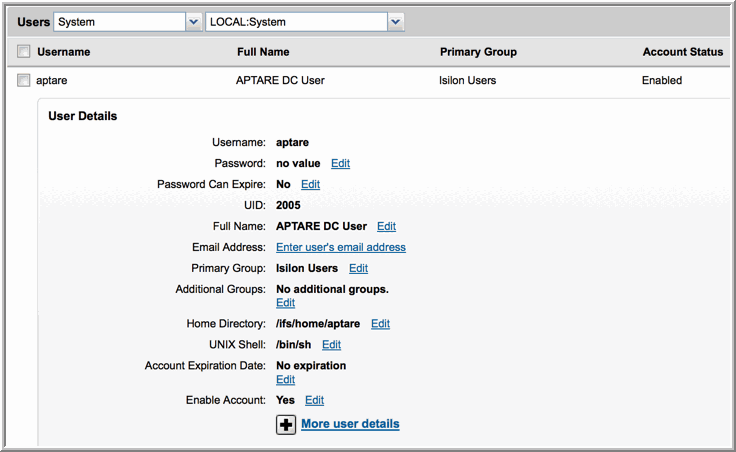
1. Using the Isilon administrative web interface, Access Management/Users, create a local user on the Isilon cluster, similar to the details shown in the following example.
2. Log in to any node of the cluster as root.
3. At the command line, grant this new user AuditAdmin privileges to enable SSH access to the cluster.
# isi auth roles modify AuditAdmin --add-user aptare
Create a Drop-In Sudoers File
Create a drop-in sudoers file in the correct directory to restrict the commands that this user can execute.
1. Configure visudo to modify the sudoers file. visudo will use the editor specified in the $EDITOR variable, or vi, by default.
• Specify your desired editor. For example, to use nano as your editor, execute the following:
# export EDITOR=nano
2. Once your desired editor is configured, execute the following command to edit the sudoers file.
# visudo -f /usr/local/etc/sudoers.d/aptare
3. Add the following lines to the sudoers file, substituting the name of the user you created for <username>.
<username> ALL=(ALL) NOPASSWD: /usr/local/bin/snmpbulkwalk, \
/usr/bin/isi, /usr/bin/isi_for_array, /usr/bin/isi_hw_status
4. Save the sudoers file.
Installation Overview
Use the following list to ensure that you complete each step in the order indicated. Each item in this list corresponds to a section in this guide that contains the step-by-step instructions.
1. Update the Local Hosts file. This enables Portal access.
3. In the Portal, add Data Collector Policies for storage arrays and host data collection.
Update the Local Hosts File
1. Add the Portal IP Address to the Local Hosts file on the Data Collector server or on any available client with web-browsing capabilities.
Note: Only edit the local hosts file if a DNS entry hasn’t already been set up in your enterprise to resolve both http://aptareportal.yourdomain.com and http://aptareagent.yourdomain.com to the Portal IP address.
a. Login to the Data Collector server.
b. On a Linux server:
vi /etc/hosts
Add entries for aptareportal.yourdomain.com and aptareagent.yourdomain.com, both resolving to the Portal server IP address.
On a Windows server:
edit C:\Windows\System32\drivers\etc\hosts
Add entries for aptareportal.yourdomain.com and aptareagent.yourdomain.com, both resolving to the Portal server IP address.
2. On the Data Collector server, add entries to the local hosts file, both resolving to the Portal server IP address.
Example:
• 172.16.2.2 aptareportal.<yourdomain>.com
• 172.16.2.3 aptareagent.<yourdomain>.com