Adding an IBM SVC Data Collector Policy
Before adding the policy: A Data Collector must exist in the Portal, to which you will add Data Collector Policies. See
Adding/Editing Data Collectors. For specific prerequisites and supported configurations, see
Capacity Manager: Collection of Array Capacity and Host Data and the
APTARE StorageConsole 9.1 Certified Configurations Guide.
1. Select Admin > Data Collection > Collectors.
The list of currently configured Portal Data Collectors is displayed.
2. Select a Data Collector from the list.
3. Click Add, and then select IBM SVC.
4. Specify Data Collector Properties.
Note: For embedded CIMOM (versions 5.1 and 6.1), create a separate Data Collector policy for each node, where you’ll enter the node’s IP address in the IBM SVC Master Console Server field. A known issue in version 5.1.08 causes vdisk data to be excluded from collection.
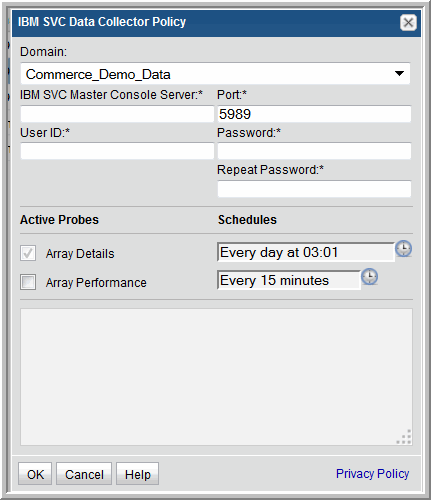
5. Enter or select the parameters. Mandatory parameters are denoted by an asterisk (*):
Field | Description | Sample Value |
Domain | The domain identifies the top level of your host group hierarchy. The name was supplied during the installation process. All newly discovered hosts are added to the root host group associated with this domain. Typically, only one Domain will be available in the drop-down list. If you are a Managed Services Provider, each of your customers will have a unique domain with its own host group hierarchy. To find your Domain name select Admin > Hosts and Domains > Domains. | yourdomain |
IBM SVC Master Console Server* | The address of the IBM SVC Master Console Server—either the IP address or server name. For embedded CIMOM, enter the node’s IP address (create a Data Collector policy for each node). | eva_server1 |
Port* | The port of the IBM SVC Server. The default SVC port is 5989. | 5989 |
User Id* | Enter the User ID for the IBM SVC Master Console Server. | Administrator |
Password* | Note: The password is encrypted prior to saving in the database and is never visible in any part of the application. | Password1 |
Array Details | Click the check box to activate the collection of array details. Click the clock icon to create a schedule. Every Minute, Hourly, Daily, Weekly, and Monthly schedules may be created. Relative schedules are relative to when the Data Collector is restarted. Advanced use of native CRON strings is also available. Examples of CRON expressions: */30 * * * * means every 30 minutes */20 9-18 * * * means every 20 minutes between the hours of 9am and 6pm */10 * * * 1-5 means every 10 minutes Mon - Fri. | |
Array Performance | Click the checkbox to activate performance collection. Note that at least one collection from this array must be performed BEFORE array performance data can be collected. Also, statistics collection must be enabled via the IBM SVC user interface: Manage Clusters > Start Statistics Collection Click the clock icon to create a schedule. | |
6. Click OK to save the policy.
7. On the Data Collector server, install/update the Data Collector software.