7. Click Next.
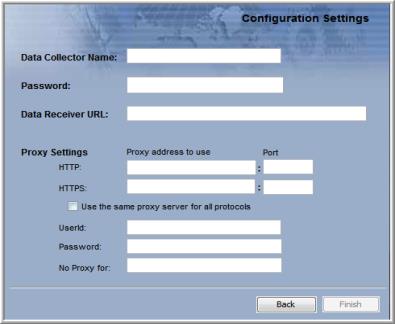
8. Enter the configuration settings for your particular environment.
Field | Description |
Data Collector Name * | A unique name assigned to this Data Collector. This is the name that you used during the Pre-Installation setup. The Data Collector will use this value for authentication purposes. |
Password * | The password assigned to this Data Collector. The password is encrypted prior to saving in the APTARE IT Analytics database and is never visible in any part of the application. |
Data Receiver URL * | This is the URL the Data Collector uses to communicate to the Portal server. The format of this URL should be: http://aptareagent.yourdomain.com It is similar to the URL you use to access the web-based Portal (http://aptareportal.yourdomain.com). IMPORTANT NOTE: Be sure to enter the URL with the prefix aptareagent and NOT aptareportal. |
Proxy Settings (Optional) | Enter the proxy server details for both http and https, including the User ID and Password for the server. HTTP/HTTPS: Enter a hostname or IP address and a port number. Use the same proxy server for all protocols: Check this box if the proxy server is used for all. User ID & Password: Enter the credentials for the proxy server. No Proxy for: List hostnames or IP addresses that will not be proxied.
Examples: 192.168.1.1/21, localhost |
* Denotes a mandatory configuration.
9. After entering the configuration settings, click Next.
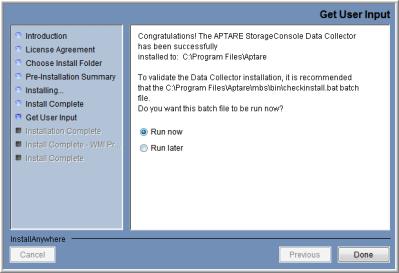
At this point, the Data Collector has been successfully installed, however, to validate the Data Collector installation, it is recommended that you run the C:\Program Files\Aptare\mbs\bin\checkinstall.bat batch file.
10. Choose Run now and click Done in the Get User Input window to validate the installation and then quit the installer.
The InstallAnywhere portion of the installation is now complete and the process continues with the command-line script execution.
Console Installation Instructions
Follow these instructions when installing on a Linux server that does not have X-Windows. The Installer will guide you through the sequence of steps to install and configure the Data Collector. If at any time you need to go back a step, simply type ‘back’ at the prompt.
Note: The Data Collector installer does not support console-based installation for the Windows operating system.
1. From your telnet session cd to the location where the Data Collector Installer file has been saved.
2. Execute the following commands, substituting the relevant Data Collector Installer name for <installer_name>.bin.
chmod +x <installer_name>.bin
sh ./<installer_name>.bin –i console
3. InstallAnywhere will prepare to install the Data Collector software.
=====================================================
(created with InstallAnywhere by Macrovision)
-----------------------------------------------------
Introduction
------------
InstallAnywhere will guide you through the installation of the APTARE IT Analytics Data Collector.
It is strongly recommended that you quit all programs before continuing with this installation.
Respond to each prompt to proceed to the next step in the installation. If you want to change something on a previous step, type 'back'.
You may cancel this installation at any time by typing 'quit'.
PRESS <ENTER> TO CONTINUE:
4. The License Agreement will be displayed.
License Agreement
-----------------
Installation and use of APTARE IT Analytics requires acceptance of the following License Agreement:
PLEASE READ THIS SOFTWARE LICENSE AGREEMENT CAREFULLY. BY DOWNLOADING, INSTALLING OR USING THE SOFTWARE YOU INDICATE ACCEPTANCE OF AND AGREE TO THETERMS AND CONDITIONS OF THIS AGREEMENT….<etc.>
5. Read the agreement and type Y to accept it.
6. The installer will prompt for the installation location:
Choose Install Folder
---------------------
Where would you like to install?
Default Install Folder: /opt/aptare
ENTER AN ABSOLUTE PATH, OR PRESS <ENTER> TO ACCEPT THE DEFAULT
: /opt/aptare
INSTALL FOLDER IS: /opt/aptare
IS THIS CORRECT? (Y/N): y
7. A Pre-Installation Summary will be displayed.
==================================================
Pre-Installation Summary
------------------------
Please Review the Following Before Continuing:
Product Name:
APTARE IT Analytics
Install Folder:
/opt/aptareagent
Link Folder:
/tmp/install.dir.30662/Do_Not_Install
Product Components:
APTARE IT Analytics Agent,
Help
Java VM Installation Folder:
/opt/aptareagent/jre
Disk Space Information (for Installation Target):
Required: 136,083,162 bytes
Available: 3,786,149,888 bytes
PRESS <ENTER> TO CONTINUE:
8. The installation process will track the progress:
==================================================
Installing...
-------------
[==================|==================|=============]
[------------------|------------------|-------------]
9. The installer will prompt for the Data Collector Name. This is the ID that will be used on the Portal side to authenticate the Data Collector. This value should be the same value you configured on the Portal for the field “ID” during the Pre-Installation step.
Enter Data Collector Name
(Required Field)
Data Collector Name (DEFAULT: ):
10. The installer will prompt for the Data Collector Password. This is the password that will be used on the Portal side to authenticate the Data Collector. This value should be the same value you configured on the Portal for the field “passcode” during the Pre-Installation step.
Configuration Settings - 2
--------------------------
Enter Data Collector Password:
(Please enter the Password, which will be used to authenticate the Data
Collector with the Data Receiver)
(Required)
Data Collector Password: password1
11. The installer will prompt for the Data Receiver URL. This is the URL the Data Collector uses to communicate to the Portal server. This is the URL the Data Collector uses to communicate to the Portal server. The format of this URL should be:
http://aptareagent.yourdomain.com
It is similar to the URL you use to access the web-based Portal (http://aptareportal.yourdomain.com).
IMPORTANT NOTE: Be sure to enter the URL with the prefix aptareagent and NOT aptareportal!
Configuration Settings - 3
--------------------------
Enter Data Receiver URL
(Required Field)
Data Receiver URL (DEFAULT: ): http://aptareagent.yourdomain.com
The installer will perform a post-install validation:
The installer will now configure the installation.
This may take a few minutes.
12. Web Proxy (HTTP) settings can be configured.
===============================================================================
Configuration Settings- 4
---------------------------
Connection Settings
Use Proxies? (Y/N) (DEFAULT: N): y
===============================================================================
Configuration Settings - 5
--------------------------
Enter HTTP Proxy IP Address
(Please leave field empty if there is no Proxy/Firewall)
HTTP Proxy IP Address (DEFAULT: ): 10.2.2.116
===============================================================================
Configuration Settings - 6
--------------------------
Enter HTTP Proxy Port
(Please leave field empty if there is no Proxy/Firewall)
HTTP Proxy Port (DEFAULT: ): 3128
===============================================================================
Configuration Settings - 7
--------------------------
Enter HTTPs Proxy IP Address
(Please leave field empty if there is no Proxy/Firewall)
HTTPs Proxy IP Address (DEFAULT: ):
===============================================================================
Configuration Settings - 8
--------------------------
Enter HTTPs Proxy Port
(Please leave field empty if there is no Proxy/Firewall)
HTTPs Proxy Port (DEFAULT: ):
===============================================================================
Configuration Settings - 9
--------------------------
Enter Proxy UserId
(Please leave field empty if there is no Proxy/Firewall)
Proxy UserId (DEFAULT: ):
===============================================================================
Configuration Settings - 10
---------------------------
Enter Proxy Password
(Please leave field empty if there is no Proxy/Firewall)
Proxy Password:
===============================================================================
Configuration Settings - 11
---------------------------
Enter comma separated IP Addresses to exclude from Proxy
(Please leave field empty if there is no Proxy/Firewall)
No Proxy for (DEFAULT: ):
===============================================================================
The installer will now configure the installation.
This may take a few minutes.
PRESS <ENTER> TO CONTINUE:===================================
Installation Complete
-----------------------------------
To validate the Data Collector installation, it is recommended that you run the <home>/mbs/bin/checkinstall.sh script.