Field | Description | Sample Value |
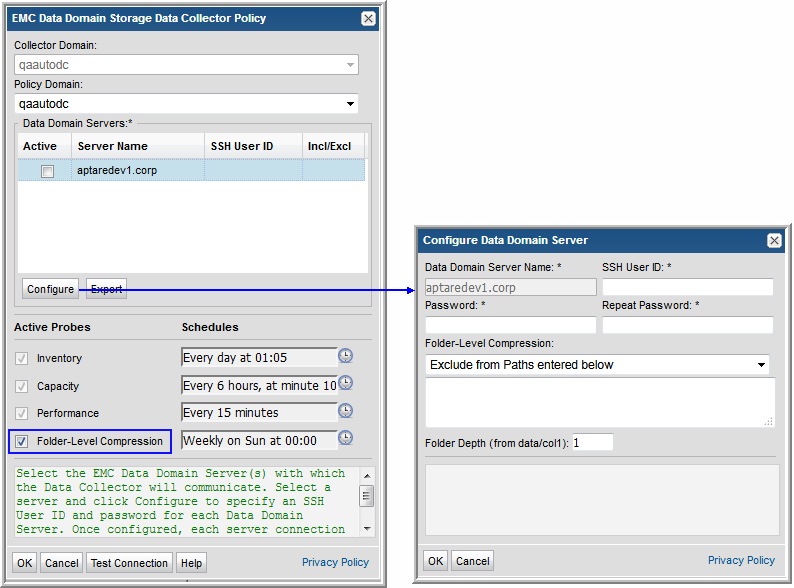
Collector Domain | The domain of the collector to which the collector backup policy is being added. This is a read-only field. By default, the domain for a new policy will be the same as the domain for the collector. This field is set when you add a collector. | |
Policy Domain | The Collector Domain is the domain that was supplied during the Data Collector installation process. The Policy Domain is the domain of the policy that is being configured for the Data Collector. The Policy Domain must be set to the same value as the Collector Domain. The domain identifies the top level of your host group hierarchy. All newly discovered hosts are added to the root host group associated with the Policy Domain. Typically, only one Policy Domain will be available in the drop-down list. If you are a Managed Services Provider, each of your customers will have a unique domain with its own host group hierarchy. To find your Domain name select Admin > Domains > Domains. | yourdomain |
Data Domain Servers* | When you check Active for a server shown in the list, a dialog window prompts for the SSH credentials. Alternatively, select a server and click Configure. In order for Data Domain Servers to be listed in the policy window, they must have been created via the Inventory and configured with a Backup Type of Data Domain Server. See Add EMC Data Domain Servers. | |
SSH User ID* | The command-line interface (CLI) via SSH is used to gather Data Domain system data. This requires a view-only Data Domain User ID that must be a member of the Data Domain system Admin group. This User ID must be the same for all addresses listed in the System Addresses entry field for the Data Domain systems. | Administrator |
Password | The password associated with the User ID. | Pwd1 |
Configure | Select a Data Domain server and click Configure to enter the SSH credentials that will be used to access the server. | |
Export | Click Export to retrieve a list of all the Data Domain servers in a comma-separated values file. | |
Inventory Probe | Inventory details such as system, enclosure, disk, MTree, Licensing, DD Boost, snapshot and file system compression are collected by default. Click the clock icon to create a schedule. You can schedule the collection frequency by minute, hour, day, week and month. Advanced use of native CRON strings is also available. Note: Explicit schedules set for a Collector policy are relative to the time on the Collector server. Schedules with frequencies are relative to the time that the Data Collector was restarted. | |
Capacity Probe | Data associated with system capacities, such as file system capacity, LSU compression and replication information, is collected by default. Click the clock icon to create a schedule. You can schedule the collection frequency by minute, hour, day, week and month. Advanced use of native CRON strings is also available. Note: Explicit schedules set for a Collector policy are relative to the time on the Collector server. Schedules with frequencies are relative to the time that the Data Collector was restarted. | |
Performance Probe | Data associated with the performance of the Data Domain system, such as CPU and disk burst indicators and disk performance indicators, is collected by default. Click the clock icon to create a schedule. You can schedule the collection frequency by minute, hour, day, week and month. Advanced use of native CRON strings is also available. Note: Explicit schedules set for a Collector policy are relative to the time on the Collector server. Schedules with frequencies are relative to the time that the Data Collector was restarted. | |
Folder-Level Compression Probe | To enable folder-level compression collection, check the box and double-click a Data Domain server above to specify the folder paths to exclude or include in collection. This probe collects folder-level compression ratios for both folders and files stored on Data Domain Boost connections, CIFS shares or NFS mounts. When this probe is selected, DataDomain configured CIFS or NFS pathnames can be entered into the Folder-Level Compression list configured for a Data Domain Server. The Data Domain Servers will then display an Include/Exclude column, with negative numbers indicating pathnames that are excluded and positive numbers indicating pathnames that are included. Hover your mouse over the Incl/Excl column to view the pathnames. If the column displays +0, it indicates no pathnames have been included in the collection, and -0 indicates no pathnames have been excluded, so all configured CIFS or NFS pathnames will be collected from. Warning: Choosing to exclude compression collection with an empty folder list may cause collection to take several hours to complete. | |
Test Connection | Test Connection initiates a Data Collector process that attempts to connect to the subsystem using the IP addresses and credentials supplied in the policy. This validation process returns either a success message or a list of specific connection errors. Test Connection requires that Agent Services are running. Several factors affect the response time of the validation request, causing some requests to take longer than others. For example, there could be a delay when connecting to the subsystem. Likewise, there could be a delay when getting the response, due to other processing threads running on the Data Collector. You can also test the collection of data using the Run functionality available in Admin > Data Collection > Collectors. This On-Demand data collection run initiates a high-level check of the installation at the individual policy level, including a check for the domain, host group, URL, Data Collector policy and database connectivity. You can also select individual probes and servers to test the collection run. See Working with On-Demand Data Collection for details. |