Field | Description | Sample Value |
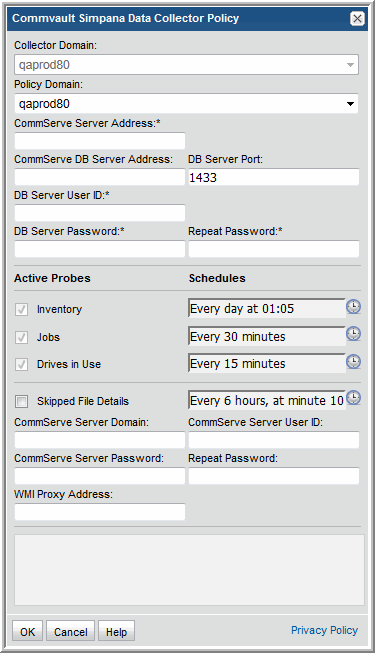
Collector Domain | The domain of the collector to which the collector backup policy is being added. This is a read-only field. By default, the domain for a new policy will be the same as the domain for the collector. This field is set when you add a collector. | |
Policy Domain | The Collector Domain is the domain that was supplied during the Data Collector installation process. The Policy Domain is the domain of the policy that is being configured for the Data Collector. The Policy Domain must be set to the same value as the Collector Domain. The domain identifies the top level of your host group hierarchy. All newly discovered hosts are added to the root host group associated with the Policy Domain. Typically, only one Policy Domain will be available in the drop-down list. If you are a Managed Services Provider, each of your customers will have a unique domain with its own host group hierarchy. To find your Domain name select My Profile in the User Account menu. | yourdomain |
CommServe Server Address | Specify the IP address or host name of the CommServe server. This field is required. | |
CommServe DB Server Address | Specify the IP address or host name of the CommServe database system. This field may be empty. The CommServe database hostname defaults to the CommServe server if the field is empty. | 192.168.0.1-250, 192.168.1.10, myhost |
DB Server Port | Specify the port used by the CommServe database. The default is 1433. This port is not enabled by default on the SQL server. Once this port is configured on the SQL server, the server must be restarted before data collection can occur. | |
DB Server User ID* | Specify the read-only user ID (with a non-expiring password) for the CommServe database. This is a SQL authentication login with at least the following roles and permissions in the CommServe database: db_datareader - EXECUTE dbo.GetDateTime - EXECUTE dbo.GetUnixTime - EXECUTE dbo.GetJobFailureReason - EXECUTE dbo.JMGetLocalizedMessageFunc This field is required. | |
DB Server Password* | The non-expiring password associated with the User ID. This field is required. | |
Repeat Password | The password associated with the User ID. | |
Active Probes | ||
Inventory | Click the clock icon to create a schedule frequency for collecting data relating to system details such as system, disk, tape, VTL and filesystem compression. You can schedule the collection frequency by minute, hour, day, week and month. Advanced use of native CRON strings is also available. Optimize performance by scheduling less frequent collection. Note: Explicit schedules set for a Collector policy are relative to the time on the Collector server. Schedules with frequencies are relative to the time that the Data Collector was restarted. | |
Jobs | Click the clock icon to create a schedule frequency for collecting data relating to backup jobs. The default collection is every 30 minutes. You can schedule the collection frequency by minute, hour, day, week and month. Advanced use of native CRON strings is also available. The default maximum number of hours that will be collected is 168 (7 days). Note: Explicit schedules set for a Collector policy are relative to the time on the Collector server. Schedules with frequencies are relative to the time that the Data Collector was restarted. | |
Drives in Use | Click the clock icon to create a schedule frequency for collecting data relating to the drives in use for backup. You can schedule the collection frequency by minute, hour, day, week and month. Advanced use of native CRON strings is also available. Note: Explicit schedules set for a Collector policy are relative to the time on the Collector server. Schedules with frequencies are relative to the time that the Data Collector was restarted. | |
Skipped File Details | Activates skipped file collection details - this collects which files had problems during backup/restore and needed to be skipped. It collects client logs and may require WMI proxy information. Click the clock icon to create a schedule frequency for collecting data relating to the skipped files during backup. You can schedule the collection frequency by minute, hour, day, week and month. Advanced use of native CRON strings is also available. Note: Explicit schedules set for a Collector policy are relative to the time on the Collector server. Schedules with frequencies are relative to the time that the Data Collector was restarted. Note: By default, this field is not selected. Activating this field will cause another collection to run periodically that may take hours (depending on the number of clients). You can also access the CommCell GUI for additional information. | |
CommServe Server Domain | Specify the domain associated with the User ID. This field must be combined the CommServe Server User ID. If this field is blank, a local user account (.\username) will be used. | |
CommServe Server User ID | Specify the user ID with administrative privileges on the CommServe server. This field must be combined the CommServe Server Domain. If this field is blank, a local user account (.\username) will be used.The User ID and Password fields are required for the Skipped File Details collection. | |
CommServe Server Password | The password associated with the CommServe Server User ID. The User ID and Password fields are required for the Skipped File Details collection. | |
Repeat Password | The password associated with the User ID. | |
WMI Proxy Address | Specify the IP address or hostname of the WMI Proxy. If this field is blank, 127.0.0.1 will be used. | |