.


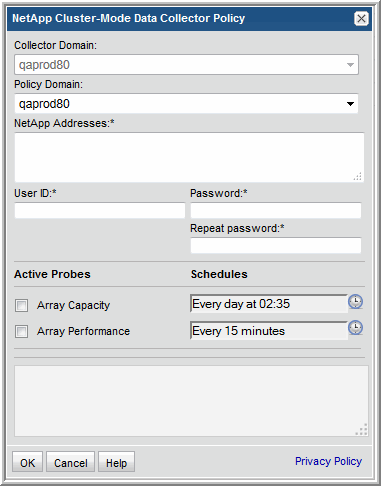
Field | Description | Sample Value |
Collector Domain | The domain of the collector to which the collector backup policy is being added. This is a read-only field. By default, the domain for a new policy will be the same as the domain for the collector. This field is set when you add a collector. | |
Policy Domain | The Policy Domain is the domain of the policy that is being configured for the Data Collector. The Policy Domain must be set to the same value as the Collector Domain. The domain identifies the top level of your host group hierarchy. All newly discovered hosts are added to the root host group associated with the Policy Domain. Typically, only one Policy Domain will be available in the drop-down list. If you are a Managed Services Provider, each of your customers will have a unique domain with its own host group hierarchy. To find your Domain name select Admin > Hosts and Domains > Domains. | |
NetApp Address* | One or more Cluster-Mode IP addresses or host names to probe. Comma-separated addresses or IP ranges are supported, for example, 192.168.0.1-250, 192.168.1.10, myhost. If you use VMs in a management server configuration, be sure to connect to the filer node IPs and not the VM. Note that these are for ONTAP Cluster-Mode and ONTAP 7 addresses cannot be used. | 192.168.0.1-250, 192.167.1.10, myhost |
User ID* | The view-only user ID for accessing NetApp ONTAP Cluster-Mode storage. | |
Password* | The password associated with the User ID. | |
Array Capacity | Check the box to collect array capacity data from your NetApp Cluster-Mode environment. Click the clock icon to create a schedule. Every Minute, Hourly, Daily, Weekly, and Monthly schedules may be created. Advanced use of native CRON strings is also available. Examples of CRON expressions: */30 * * * * means every 30 minutes */20 9-18 * * * means every 20 minutes between the hours of 9am and 6pm */10 * * * 1-5 means every 10 minutes Mon - Fri. Note: Explicit schedules set for a Collector policy are relative to the time on the Collector server. Schedules with frequencies are relative to the time that the Data Collector was restarted. | 1 */4 * * * |
Array Performance | Check the box to collect array performance data. Note that at least one collection from this array must be performed BEFORE array performance data can be collected. Click the clock icon to create a schedule. |